How to make a tutorial video
A good tutorial video answers one question clearly, in the shortest time the topic allows. It does not need expensive gear, a polished script, or a film studio. It needs a clear outline, a clean recording, and just enough editing to keep viewers focused.
This guide walks through the full process of making a tutorial video - planning the structure, recording the screen and voice, editing for clarity, and publishing where your audience will find it. It covers free built-in tools, dedicated tutorial video software, and the tradeoffs between them.
Plan the tutorial video before you record
Most tutorial videos that fail do so before the recording starts. Spend ten minutes on the plan and you save an hour in editing.
Pick one question. A tutorial video should answer exactly one question: “How do I export a video in Premiere Pro?”, “How do I set up SSO in Okta?”, “How do I draft a sales email in HubSpot?”. If your topic feels too big, split it into a series of shorter videos instead of one long one.
Write a rough outline, not a full script. Three to five bullet points covering the steps you will demonstrate. A verbatim script makes most narrators sound stiff. Bullet points let you talk naturally while staying on track.
Decide the length up front. Most software tutorials should land between 60 seconds and 5 minutes. Anything longer needs chapters and a strong reason for the extra runtime. Tutorials over 10 minutes have sharp drop-off rates on YouTube and embedded players.
Practice the flow once. Walk through the steps you will record before you hit record. You will discover the dead ends, missing logins, and “let me find that file” moments that ruin a take.
What you need to make a tutorial video
A short list. Nothing here is essential except a screen recorder.
- A screen recorder. Built-in tools (Screenshot toolbar on Mac, Xbox Game Bar on Windows) work for basic captures. Dedicated tools add zoom, cursor effects, and editing.
- A microphone. The built-in laptop mic picks up keyboard clicks and room echo. A basic USB mic or even AirPods are a noticeable upgrade.
- A webcam (optional). A small camera overlay in the corner helps viewers connect with the narrator. Skip it if you are camera-shy or if the content is purely procedural.
- A quiet space. More important than gear. Close the window, turn off the fan, mute notifications, and warn your housemates.
Record a tutorial video with built-in tools
Free, fast, and good enough for internal Loom-style messages. Limited for anything you publish externally.
On Mac:
- Press Cmd + Shift + 5 to open the Screenshot toolbar
- Choose Record Entire Screen or Record Selected Portion
- Click Options to enable your microphone
- Click Record, walk through your steps, then press Cmd + Control + Esc to stop
On Windows:
- Press Windows + G to open the Xbox Game Bar
- Click the Capture widget, then the Record button
- Press Windows + Alt + R to stop
What you get: A raw video file. No zoom on important UI elements, no animated cursor, no easy way to cut out the moment when you fumbled a click. For internal videos shared with a coworker, this is fine. For external tutorials, it shows.
Record a tutorial video with dedicated software
This is where most published tutorial videos come from. Dedicated tools handle the recording and the editing in one app, so you do not bounce between QuickTime, Final Cut, and a separate animation tool.
The category includes Tight Studio, Loom, Screen Studio, Camtasia, ScreenPal, and others. The differences mostly come down to which post-production effects are automated and how much manual editing is required.
Steps with Tight Studio
- Download Tight Studio and open the app
- Pick a recording area - full screen, a specific window, or a custom region
- Turn on your microphone, and optionally enable the webcam for a corner overlay
- Click Record, walk through your tutorial, then stop
- The recording opens in the built-in editor automatically
What Tight Studio adds
- Zoom animation - Smart zoom follows your clicks with motion blur and smooth panning, so viewers see exactly which button you pressed without you stopping to explain it
- Cursor animation - The cursor gets enlarged with click highlighting and optional click sounds, so it never gets lost in a busy UI
- AI voiceover - Generate professional narration from typed text. Useful for redoing a section without re-recording, or for narrators who would rather write than speak
- Multi-take recording - Record sections one at a time and combine them in the editor. A mistake in step 4 does not mean restarting from step 1
- Text annotations - Add labels, callouts, and titles with customizable fonts, sizes, and colors
- Intro and outro slides - Brand the start and end of the tutorial with a logo, title, and call-to-action
- Background music - Royalty-free music library with volume control for tutorials that need pacing without distracting the narration
Edit the tutorial video
Three things to do in editing, in priority order.
Cut the dead air. Pauses, “ums”, and the gap between sentences. A tutorial that takes 4 minutes to watch should be 4 minutes of useful content. Most tutorials get 20-30% shorter after a single editing pass.
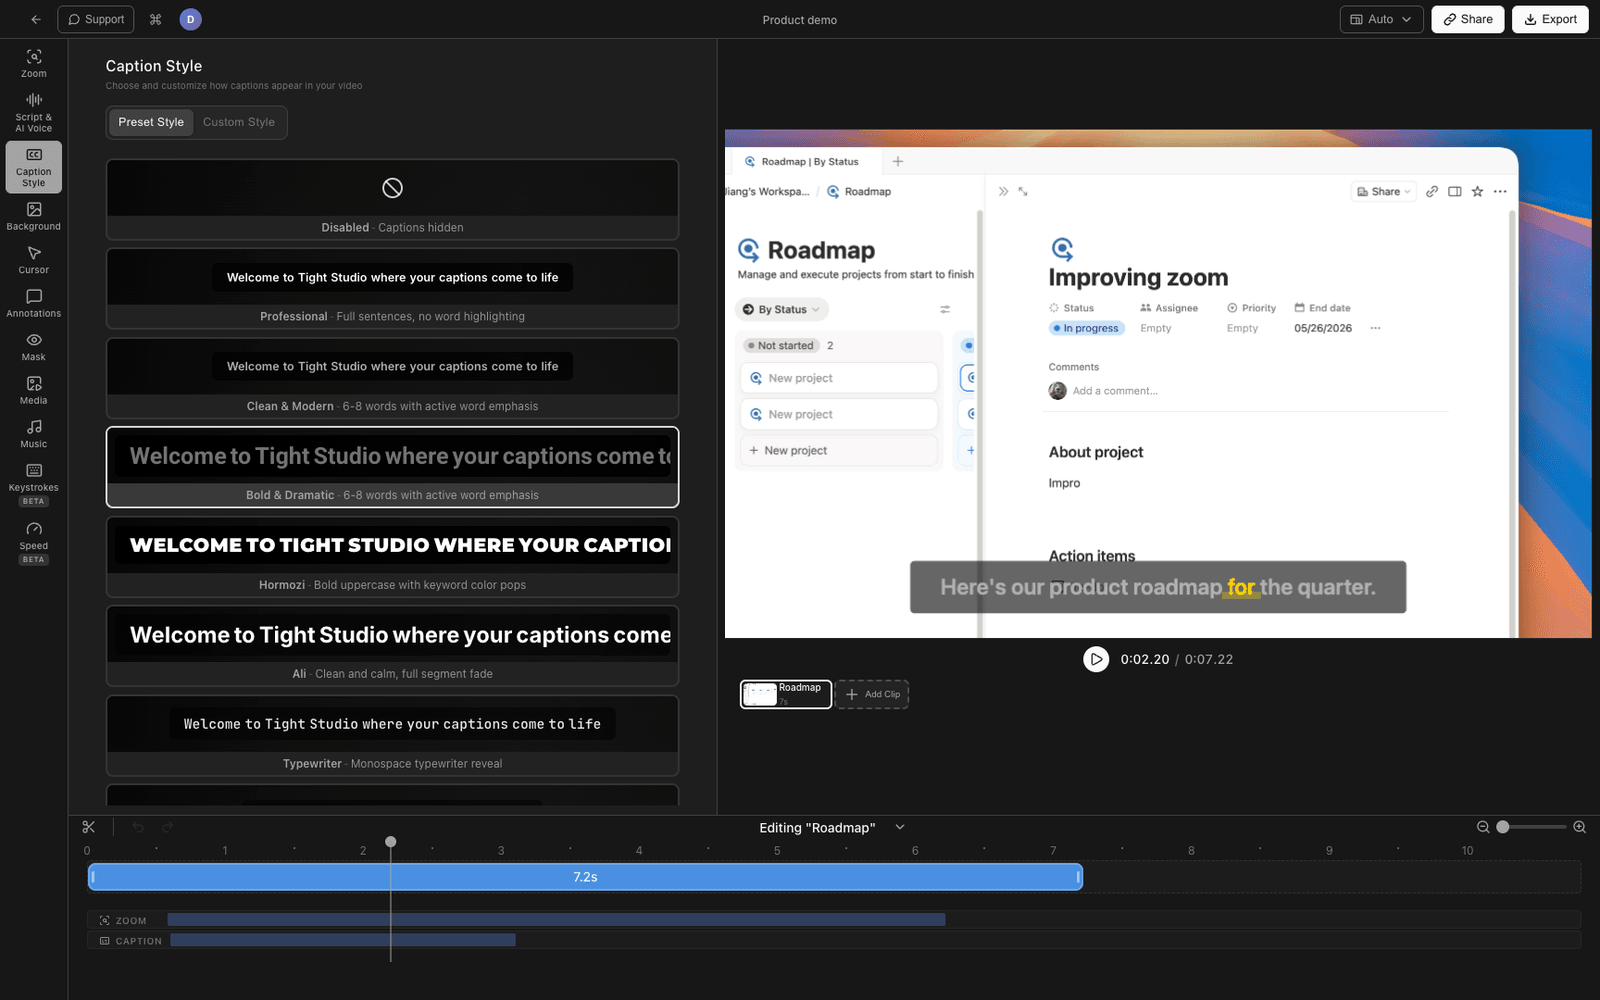
Add zoom on key clicks. When you click a small button, dropdown, or menu item, zoom in so viewers can read it. Without zoom, viewers on a phone or laptop have to squint. Tight Studio detects clicks automatically and adds the zoom for you; in Premiere or Final Cut you keyframe the scale manually.
Layer in captions or callouts. Most tutorial videos are watched without sound (in the office, on a phone in bed, on a train). Captions or on-screen text for key terms keeps viewers engaged when audio is off.
Skip the rest. Background music is optional. Fancy transitions are usually a distraction.
Publish the tutorial video
Where you publish depends on the audience.
- YouTube - Best for tutorials with public reach. Strong SEO, autoplay-able, supports chapters and captions natively. Slow to upload, no analytics on individual viewer drop-off.
- Embedded on your site - Best for product walkthroughs, onboarding, and support articles. Use a host that supports adaptive bitrate and link-based sharing.
- Shareable link - Best for sales demos, async standups, and team updates. Tight Studio creates a shareable link automatically after export. Loom is the category leader here.
- Direct file - Send the .mp4 over Slack or email. Fastest path for one-off internal tutorials.
If you are not sure, default to YouTube unlisted: it gives you a shareable link, free hosting, and the option to make it public later if it turns into evergreen content.
Comparing tutorial video methods
| Method | Cost | Recording | Editing | Best for |
|---|---|---|---|---|
| Mac Screenshot toolbar | Free | Basic | Trim only | Quick internal captures |
| Windows Game Bar | Free | Basic | None | Quick internal captures |
| QuickTime + Final Cut/Premiere | Free / Paid | Basic | Full | Heavy custom editing |
| Loom | Free tier / Paid | Good | Light trim | Async messages, sales |
| Screen Studio | Paid | Good | Auto-zoom, cuts | Polished product demos |
| Camtasia | Paid (one-time) | Good | Full timeline | Long-form training |
| Tight Studio | Free tier / Paid | Good | Auto-zoom, animated cursor, AI voiceover, multi-take | Tutorials and demos with minimal editing |
Tips for better tutorial videos
A handful of small things that separate a watchable tutorial from one viewers click away from.
Lead with the result. Show what the viewer will be able to do by the end. “By the end of this video, you will have set up a webhook in Stripe” works better than “Today we are going to talk about webhooks”.
Speak slightly slower than feels natural. Most narrators rush. A 10% slower pace reads as more confident and gives viewers a moment to follow the cursor.
Use a steady cursor. Move with purpose. Hover over a button for half a second before clicking. Rapid mouse swirls are the single biggest sign of an unedited screen recording.
Re-record short sections, not whole tutorials. If you flubbed step 4, do not start over from step 1. Modern tools (Tight Studio, Screen Studio, Loom) all support stitching takes together in the editor.
Watch the playback on a phone. Most tutorials get watched on mobile. Text that looks fine on your 27-inch monitor often disappears at thumb size.
Frequently asked questions
How do I make a tutorial video?
Plan the topic, record your screen with narration, edit for clarity, and publish. Most tutorial videos use three tools: a screen recorder (Mac’s Screenshot toolbar, Xbox Game Bar, Tight Studio, or Loom), an editor (built into the recorder or a separate app like Final Cut), and a hosting platform (YouTube, Loom, or your own site). For software demos, dedicated tools with auto-zoom and animated cursors produce a more polished result with less editing time.
What is the best software to make tutorial videos?
It depends on what you are making. Loom is best for async internal messages. Screen Studio and Tight Studio are best for polished product demos with minimal editing. Camtasia is best for long-form training videos with complex timelines. For quick internal captures, the built-in tools on Mac and Windows are free and good enough.
How long should a tutorial video be?
Most software tutorial videos should be between 60 seconds and 5 minutes. If your topic requires more than 10 minutes, split it into a series of shorter videos with chapter markers. YouTube data shows sharp drop-off in completion rates past the 5-minute mark for tutorials.
Do I need a script to make a tutorial video?
A full script is usually counterproductive - it makes most narrators sound stiff. A 3-5 bullet point outline works better. You stay on track without sounding like you are reading. The exceptions are AI voiceovers (where you do write the full text) and highly technical content where precise wording matters.
How do I record my screen and voice at the same time?
Every dedicated screen recorder supports recording your microphone alongside the screen. On Mac, open the Screenshot toolbar with Cmd + Shift + 5, click Options, and select your microphone before recording. On Windows, the Xbox Game Bar records system audio plus mic by default. Tight Studio, Loom, and Screen Studio capture screen and mic together with a single click.
Can I make a tutorial video without showing my face?
Yes. The webcam overlay is optional in every screen recorder. Many of the highest-performing software tutorials on YouTube are voice-only over the screen. Skip the camera if you are camera-shy, if you do not have a good light setup, or if the content is purely procedural.
How do I add zoom to a tutorial video?
In Tight Studio and Screen Studio, zoom is added automatically based on where you click. In Final Cut Pro or Premiere, you keyframe the scale and position properties of the clip manually. In free tools like iMovie, zoom is limited or not supported - you would need to export to a more capable editor.
How do I make a tutorial video for free?
Use the built-in screen recorder on your operating system (Cmd + Shift + 5 on Mac, Windows + G on Windows), record your narration through the microphone, and trim the result in QuickTime or the Photos app. For free editing with zoom and effects, Tight Studio and Loom both offer free tiers. For free hosting, upload to YouTube unlisted.