
Mix microphone, system audio, and background music
Balance recorded sound, download originals, and add project-wide or precisely timed music.
Before you start
The Audio panel separates project-wide Music from the active clip’s recorded Microphone Audio and System Audio. A recorded-audio tab appears only when the selected clip contains that track.
Music volume is project-wide. Microphone and system volume are clip-specific, so switch clips before changing those tracks in a multi-clip project.
- Editor tab
- Audio
- Simple music mode
- One selected track applied to all clips
- Advanced music mode
- Multiple precisely timed timeline segments
- Mute a track
- Set its Volume to 0%
Follow these steps
- Step 1
Balance microphone and system audio
Click Audio in the left sidebar. Choose Microphone Audio or System Audio when that tab is available, then adjust Volume from 0% to 100%. A value of 0% mutes that track in preview and export.
The setting applies only to the active clip. Switch clips and repeat when different recordings need different levels.
- Step 2
Download the recorded audio
Under Microphone Audio, click Download original audio to save the clip’s microphone or primary recording as a standalone file.
Under System Audio, click Download system audio to save the computer-output track. Tight Studio shows Original audio downloaded or System audio downloaded after a successful save.
- Step 3
Enable project-wide background music
Choose Music and turn on Enable Background Music (applied to all clips). Set Volume low enough that speech remains clear.
Under Select Music, choose a built-in track or click Upload your own music. Built-in choices include Warm, Neon, Breeze, Crisp, Pulse, Jazz, Spark, Horizon, Glow, and Drift; use each play button to preview before selecting.
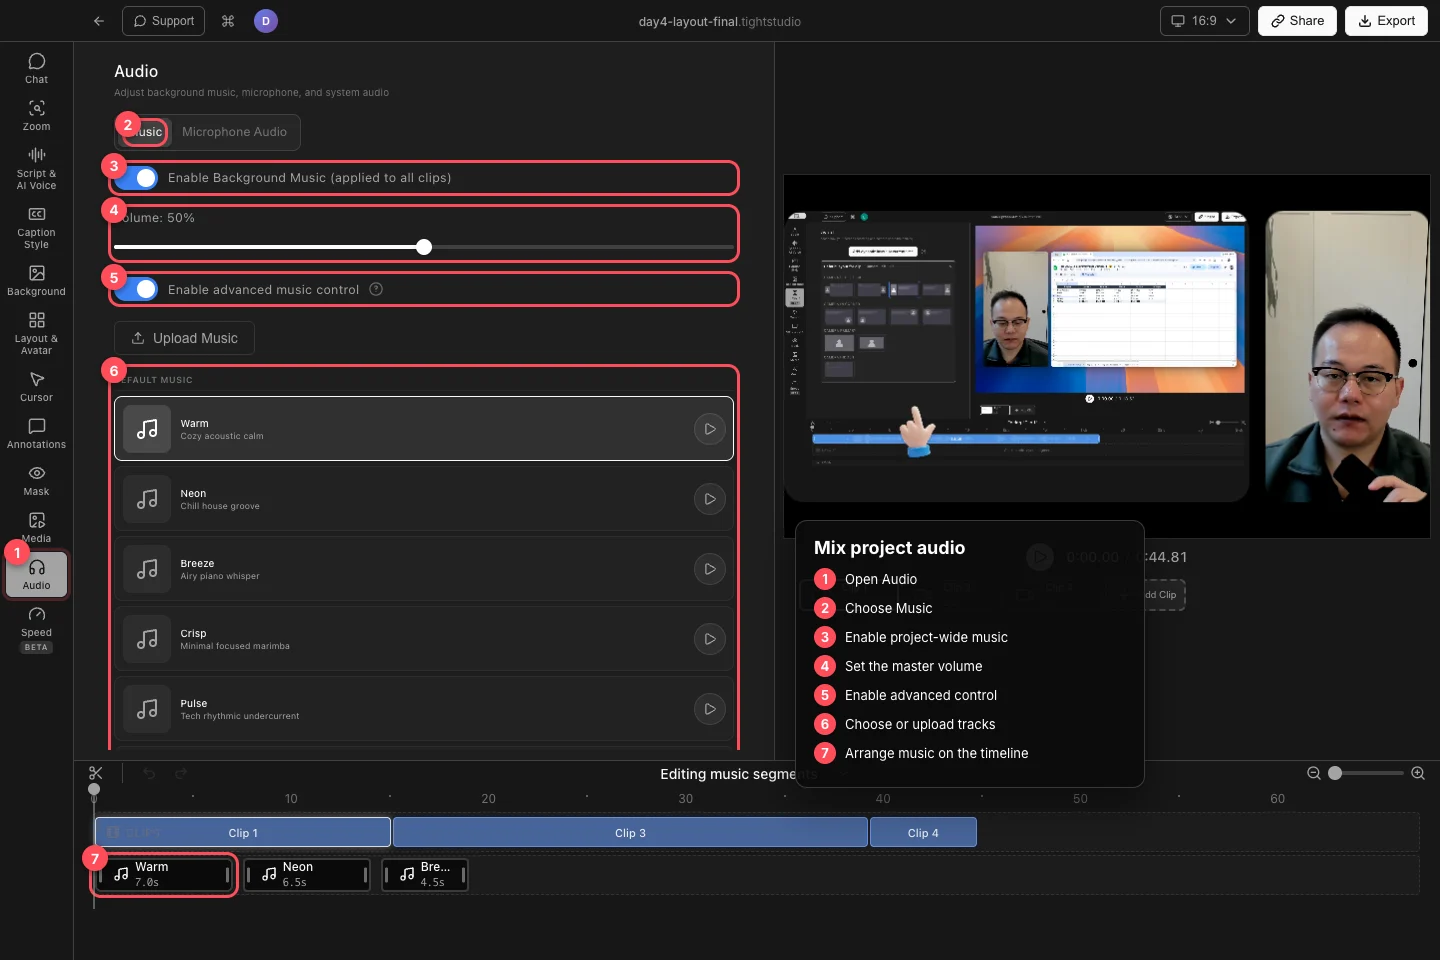
Enable music for the project, set its master volume, then use advanced control for multiple precisely timed tracks. - Step 4
Choose from the music library or upload audio
In simple mode, opening Select Music shows your uploaded tracks and the Default Music collection. Choosing a track replaces the current project-wide selection.
Click Upload your own music in simple mode or Upload Music in advanced mode. Tight Studio accepts common audio formats including MP3, WAV, AAC, M4A, OGG, and FLAC and adds imported tracks to Your Music.
- Step 5
Arrange precisely timed music segments
Turn on Enable advanced music control to open the full Music Library and MUSIC timeline. Tight Studio creates a music segment for the selected track when the advanced timeline is initially empty.
Drag library tracks onto the MUSIC timeline to add multiple cues. Move a segment to set its start, trim its edges to control the source range and duration, and select it to change Segment Volume or Delete Segment. Effective volume combines the Music master Volume with the segment’s own volume.
Troubleshooting
Why is Microphone Audio or System Audio missing?
That tab appears only when the active clip contains the matching recorded track. Select another clip, or confirm the original recording captured that source.
Why can’t I hear the music?
Turn on Enable Background Music (applied to all clips), raise the master Volume above 0%, and move the playhead inside a music segment when advanced control is enabled. Also check the selected segment’s Segment Volume.
Why did one volume change affect every clip?
Music Volume is a project-wide master control. Microphone Audio and System Audio volumes are per clip. Use advanced segments for track-specific music levels and timing.
Still stuck?
Send us a note with the project name and the step where you got blocked.