
Navigate the timeline, split clips, trim, and undo changes
Move around a clip, remove unwanted parts, and safely reverse or restore edits.
Before you start
Open a project and select the clip you want to edit in the clip carousel below the preview. The timeline shows that clip’s kept video segments as blue blocks; playback, splitting, trimming, and segment deletion apply to the selected clip.
Tight Studio saves project edits automatically. Undo and Redo give you a quick way to test a cut and reverse it before moving on, while timeline zoom changes only how much detail you see—it does not change the video’s timing or export.
- Play or pause
- Space
- Split at playhead
- Cmd+X on Mac or Ctrl+X on Windows
- Undo / Redo
- Cmd+Z / Cmd+Shift+Z on Mac, Ctrl on Windows
Follow these steps
- Step 1
Play, pause, and scrub to the right moment
Select the circular Play button below the preview to start playback; it changes to Pause while the video is playing. Select it again to pause, or press Space to switch between play and pause without leaving the timeline.
Drag the playhead—the vertical line and handle over the timeline—to scrub backward or forward. The time readout below the preview shows the current time and total duration. For frame-level positioning, pause first and press the Left Arrow or Right Arrow key.
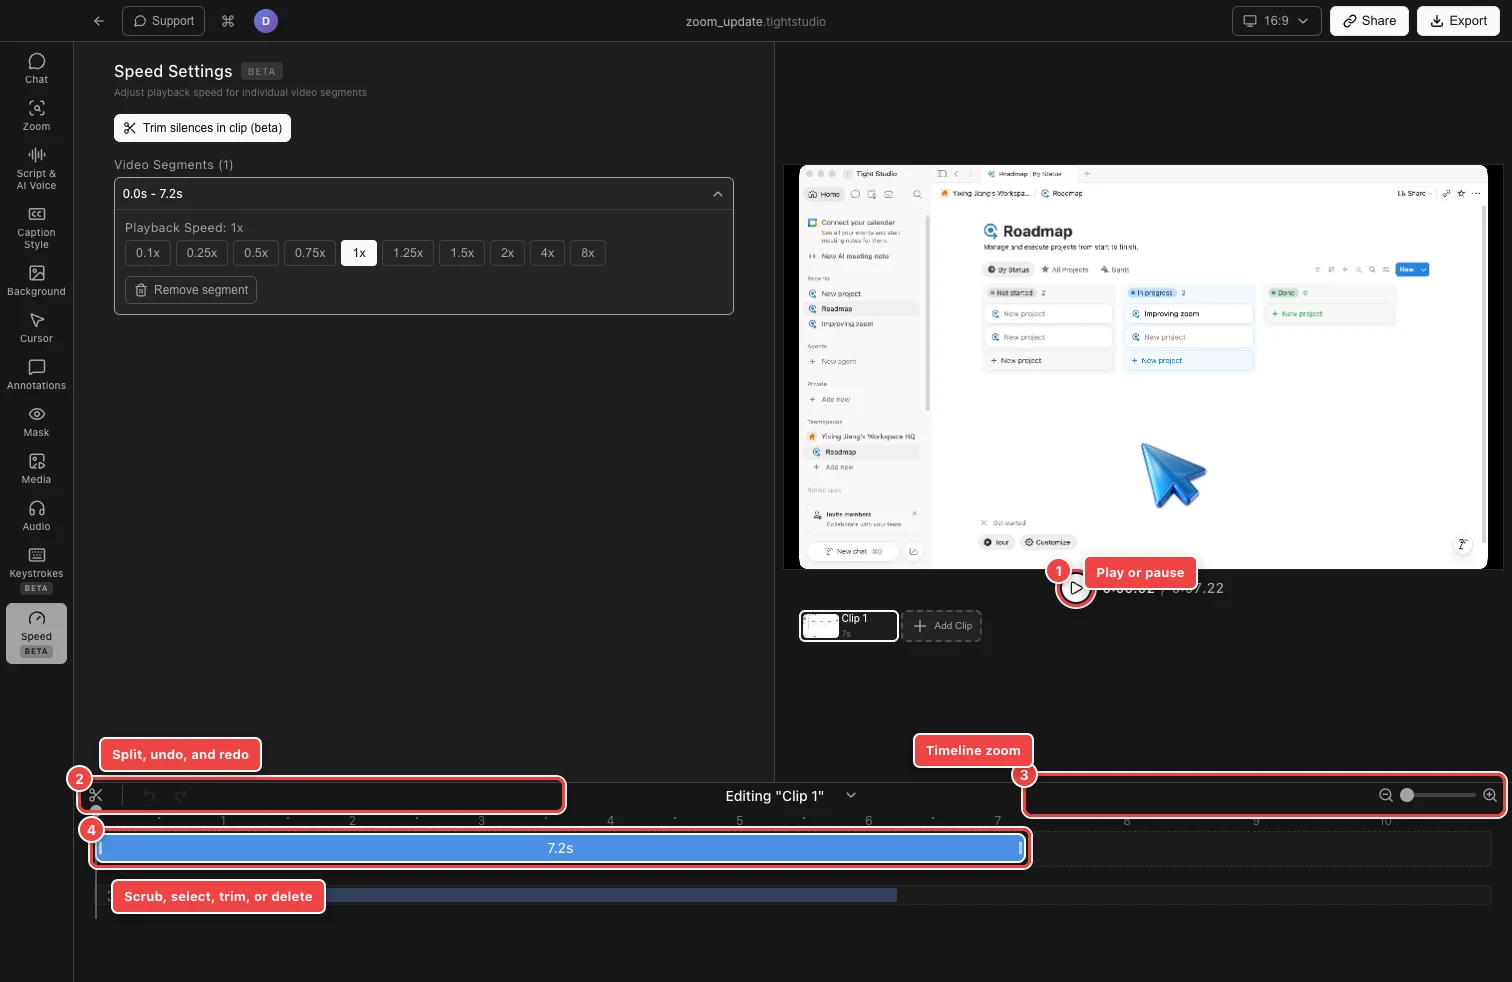
Use the playhead and timeline controls to find a cut, split or trim it, and reverse the edit if needed. - Step 2
Adjust the timeline zoom
Use See more detail on the right side of the control bar to spread the timeline out around the playhead. This makes short sections and trim handles easier to target. Use See less detail to fit more of the clip on screen, or drag the slider between the two buttons to choose an intermediate level.
You can also press Cmd+Plus or Cmd+Minus on Mac, or Ctrl+Plus or Ctrl+Minus on Windows. Timeline zoom affects only the editor view; it does not speed up, slow down, or crop the exported video.
- Step 3
Split a video segment
For a visual split, select Split Tool—the scissors button on the left side of the control bar—then click the point inside a blue video segment where the cut should go. The block becomes two independently selectable segments. Click additional points to make more cuts, then press Escape or select Split Tool again to turn the tool off.
For a precise split at the current playhead, position the playhead and press Cmd+X on Mac or Ctrl+X on Windows. A split must be more than 0.1 seconds from either edge of the segment, so zoom in or move the playhead inward when a click does not create a cut.
- Step 4
Trim the beginning or end of a segment
Turn off Split Tool, then click a blue video segment to select it. Drag the white handle on its left edge to remove time from the beginning, or drag the right handle to remove time from the end. Release when the edge reaches the frame you want to keep.
Trimming is nondestructive project editing: it changes the kept source range and closes the resulting gap in the clip. Zoom in before dragging when you need a smaller adjustment.
- Step 5
Delete an unwanted segment
Use this delete segment workflow after splitting around the unwanted passage so it is its own blue block. Turn off Split Tool, click that segment to select it, and press Backspace—the default Delete selected segment shortcut. Tight Studio removes the selected segment from playback and closes the gap.
To remove several pieces in sequence, split and delete one at a time, checking playback around each join. If you delete the wrong segment, use Undo immediately to restore it.
- Step 6
Undo or redo an edit
Select Undo in the left control group, or press Cmd+Z on Mac or Ctrl+Z on Windows, to step backward through recent edits. Select Redo, or press Cmd+Shift+Z on Mac or Ctrl+Shift+Z on Windows, to restore an edit you just undid.
A dim Undo or Redo button means there is no available history in that direction. After undoing, making a different edit starts a new path and clears the previous redo path, so review a restored cut before continuing.
Troubleshooting
Why won’t Split Tool create a cut?
Confirm that Split Tool is active, then click inside a blue video segment rather than on its border. Tight Studio requires the split to be more than 0.1 seconds from either edge. Use See more detail or move the playhead farther inward and try again.
Why can’t I drag the playhead?
Scrubbing is disabled while Split Tool is active because clicks are reserved for cuts. Press Escape or select Split Tool again, then drag the playhead handle or vertical line.
Why don’t I see the trim handles?
Exit Split Tool and click the blue video segment once to select it. Its white edge handles then appear. Increase timeline zoom if the segment or handle is too narrow to grab accurately.
Why are Undo or Redo unavailable?
Undo is dim before the current editing session has a reversible change. Redo is dim until you undo something, and it becomes unavailable again after you make a different edit. In a Team Workspace, editing controls can also be unavailable while another teammate holds the clip lock.
Still stuck?
Send us a note with the project name and the step where you got blocked.