
Import, place, edit, and generate media
Use the media library to add and edit images, video, and audio or generate new visual assets with AI.
Before you start
Media is the library for visual overlays: imported images, imported video clips, and AI-generated photos or videos. Imported audio is managed from Audio → Music, where it can be placed and mixed as a soundtrack.
AI Generate requires a signed-in account and an eligible subscription with AI credits. Importing your own files does not use AI credits.
Use Import video or Import audio for your own files, place a visual as a media overlay, or create an AI image or AI video from a prompt.
- Editor tab
- Media
- Visual media
- Images and video clips
- Imported audio
- Managed under Audio → Music
- AI modes
- Photo and Video
Follow these steps
- Step 1
Import image, video, or audio files
Click Media in the left sidebar, then click Import. Choose the files in the system picker and click Import Media. Images and video clips appear in the Media library.
For an imported audio file, open Audio, choose Music, and use the track from Your Music. Audio is intentionally kept out of the visual Media grid.
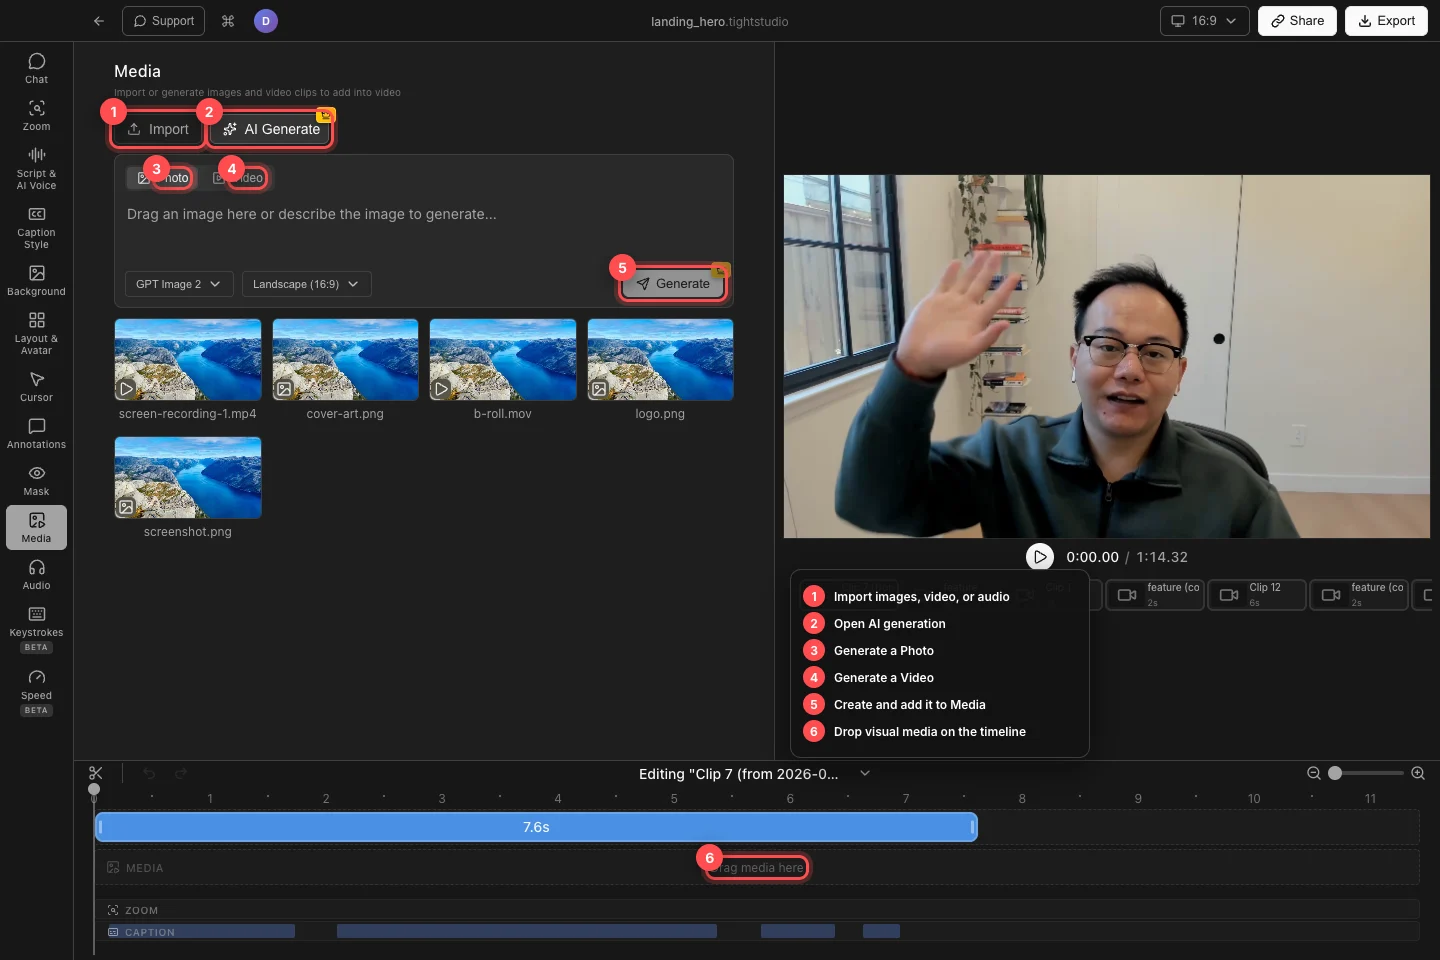
Import your own files or generate a Photo or Video, then drag visual media onto the MEDIA timeline. - Step 2
Place a visual overlay on the timeline
Click a library thumbnail to preview it. To add it to the video, drag the thumbnail onto Drag media here in the MEDIA track at the time where it should begin.
Move the resulting segment to change its start time. Drag either timeline edge to shorten or extend its visible duration; a video segment also keeps its own source timing within that range.
- Step 3
Position, resize, and crop the overlay
Move the playhead inside the media segment and select the overlay on the canvas. Drag it to reposition it, then drag a resize handle to scale it while preserving its aspect ratio.
The canvas clips anything moved beyond its edges. Use that behavior to crop an image or video to the visible area, and preview at the segment’s first and last frame before continuing.
- Step 4
Animate an image overlay
Select an image segment on the timeline to open its settings. Under Enter Animation, choose None, Fade In, Slide In, or Scale In; use the play control in Animation Preview to check it.
Expand Exit Animation to choose None, Fade Out, Slide Out, or Scale Out. Adjust the available duration, direction, distance, or scale controls for the selected animation.
- Step 5
Generate a photo or video with AI
Click AI Generate and choose Photo or Video. Describe the result you want, select the available model and aspect ratio, then click Generate. The finished asset is added to the Media library.
To guide a generation with an existing image, open AI Generate, right-click an image in the library, and add it as the image reference or video context. Generation uses AI credits; if credits are empty, the panel asks you to upgrade or refill them.
Troubleshooting
Why did my imported audio not appear in the Media grid?
The Media grid lists visual assets only. Open Audio → Music and look under Your Music; use simple music mode for one project-wide track or advanced music control for precisely timed audio segments.
Why is an overlay missing from the preview?
Move the playhead inside its MEDIA segment and confirm the segment is on the active clip. If it was dragged outside the canvas, select it on the timeline and reposition it within the visible frame.
Why is Generate unavailable or asking me to sign in?
Enter a prompt first, then sign in and confirm that the account has an eligible subscription and available AI credits. Import your own visual file when you do not want to use AI generation.
Still stuck?
Send us a note with the project name and the step where you got blocked.