
Hide sensitive details with masks
Blur or replace a timed area of the recording so private information stays hidden.
Before you start
Masks belong to the active clip and are visible only during their timeline range. Move the playhead to the first frame that needs protection before adding one.
A new mask is a one-second blur over the center of the recording. You can resize its area, strengthen the blur, replace the blur with an image, and extend its duration.
Each privacy mask can use blur or a custom mask image; mask crop controls how an uploaded image fills the protected area.
- Editor tab
- Masks
- Default duration
- 1 second
- Default style
- Blur at Default strength
- Other style
- Uploaded image mask
Follow these steps
- Step 1
Add a mask at the playhead
Select the clip, place the playhead where private information first appears, and click Mask in the left sidebar. The panel title is Masks.
Click Add mask at current time. Tight Studio adds a one-second green MASK segment, selects it, and expands its controls.
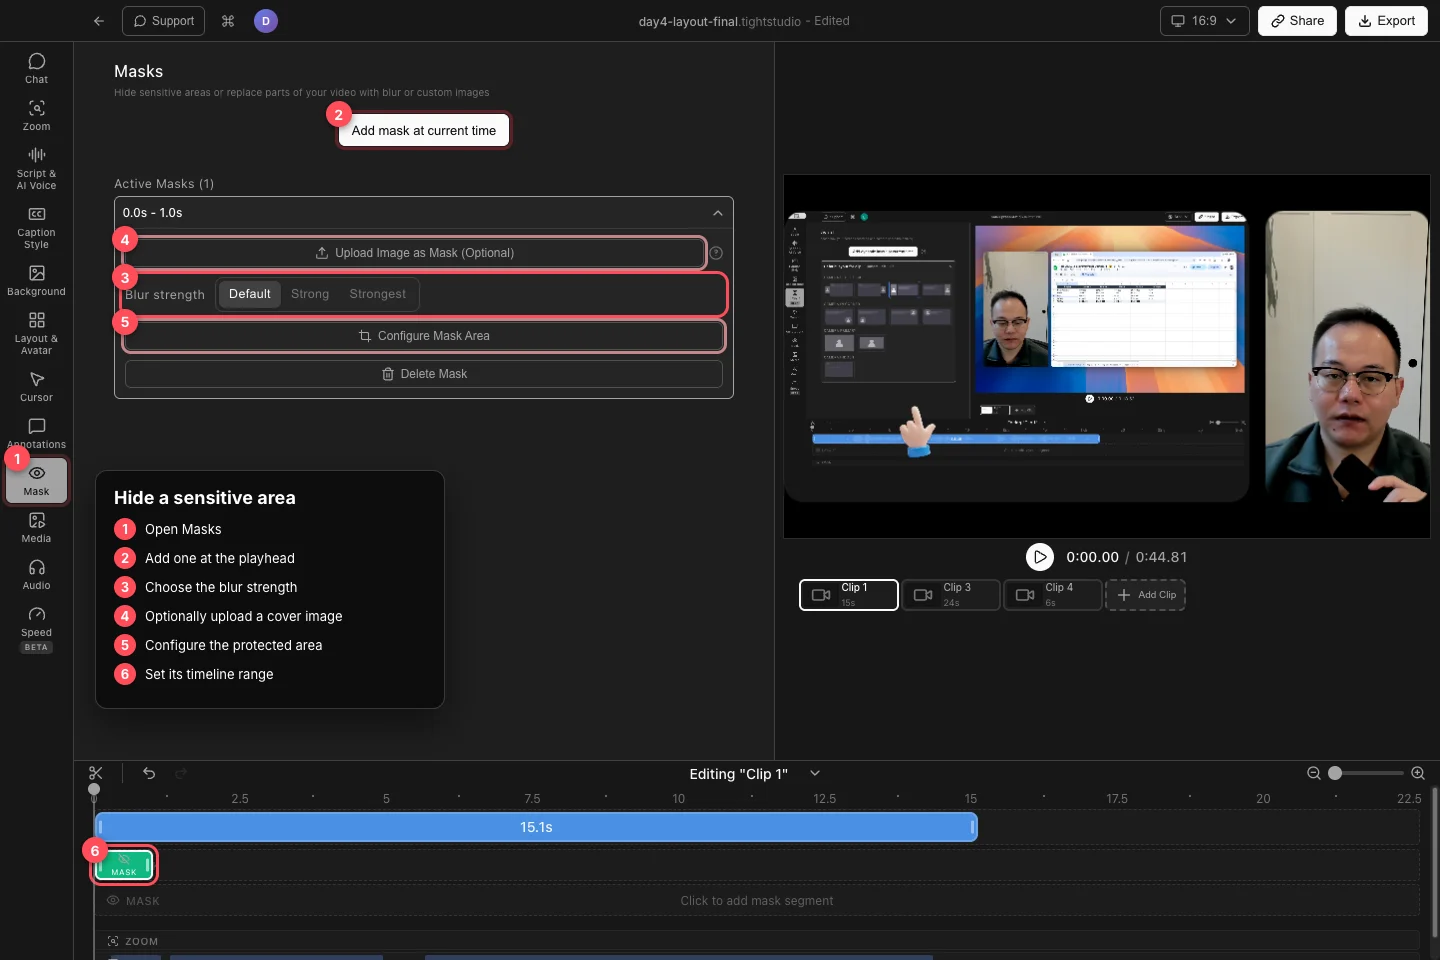
Add the mask at the playhead, choose its covering style, then set its protected area and timeline range. - Step 2
Choose the blur strength
Under Blur strength, choose Default, Strong, or Strongest. Use a stronger setting for small text or high-contrast details that remain recognizable through a lighter blur.
Check the result on the real video frame, not only while the mask is selected. The protected information should remain unreadable throughout the entire segment.
- Step 3
Configure the protected area
Click Configure Mask Area. In the captured frame, drag and resize the crop rectangle around the sensitive content, then click Apply Mask Area.
Use Reset to return to the default centered area or Cancel to leave the current area unchanged. Reopen Configure Mask Area whenever the target moves or its size changes.
- Step 4
Replace the blur with an image
Click Upload Image as Mask (Optional) to cover the selected area with a custom image instead of blur. Tight Studio changes the mask to the image style and initially preserves the uploaded image’s proportions.
Configure Mask Area again to position the image. When an image is present, use Respect aspect ratio of uploaded image to prevent distortion. Click Remove Image to return the mask to blur.
- Step 5
Set the mask timing and verify it
Drag the green MASK segment along the timeline to change when it starts. Drag either edge to extend or shorten the protected interval.
Play from just before the segment begins until just after it ends. If the sensitive item moves, use multiple masks with different areas or split the coverage into shorter timed segments. Click Delete Mask when a mask is no longer needed.
Troubleshooting
Why is the mask missing from the frame?
Move the playhead inside the green MASK segment and confirm you are editing the clip that owns it. A mask is clip-specific and does not appear outside its time range.
Why can I still read the hidden text?
Choose Strong or Strongest, enlarge the configured area so it covers every edge, and preview the video at full size. For guaranteed coverage, use an opaque uploaded image mask.
Why is my uploaded mask image stretched?
Open Configure Mask Area and turn on Respect aspect ratio of uploaded image. Resize the area again after enabling it.
Still stuck?
Send us a note with the project name and the step where you got blocked.