
Arrange screen and camera with layouts
Choose screen-only, camera-only, PIP, split, presenter, and vertical layout presets.
Before you start
Layout presets arrange the recorded screen and camera inside the canvas. Layout & Avatar appears when the active clip contains a camera recording; a screen-only clip without camera footage does not show camera layout controls.
The Default layout for clip applies for the whole clip unless a dynamic layout segment overrides it for a specific time range. Choose the canvas aspect ratio first because horizontal and vertical canvases offer different compatible presets.
The preset families cover PIP, split screen, and vertical stack compositions, with compatible choices shown for the current canvas.
- Panel
- Layout & Avatar → Layout
- Horizontal groups
- Camera Side-by-side, Camera in Corner, Camera Primary, Camera Hidden
- Vertical group
- Camera Stacked
- No camera overlay
- Screen Only
Follow these steps
- Step 1
Choose a horizontal or vertical canvas
Use the aspect-ratio menu in the title bar to choose 16:9 Landscape or 9:16 Vertical. The preset grid changes to show layouts that make sense for that orientation.
A 16:9 canvas emphasizes side-by-side and corner arrangements. A 9:16 canvas adds Camera Stacked options designed for a tall frame.
- Step 2
Open Layout & Avatar
Click Layout & Avatar in the left sidebar, then keep the Layout subtab selected. Expand Default layout for clip if its preset grid is collapsed.
The text beside the row shows the current preset, such as Camera Right - Fit or Corner Overlay - Bottom Right.
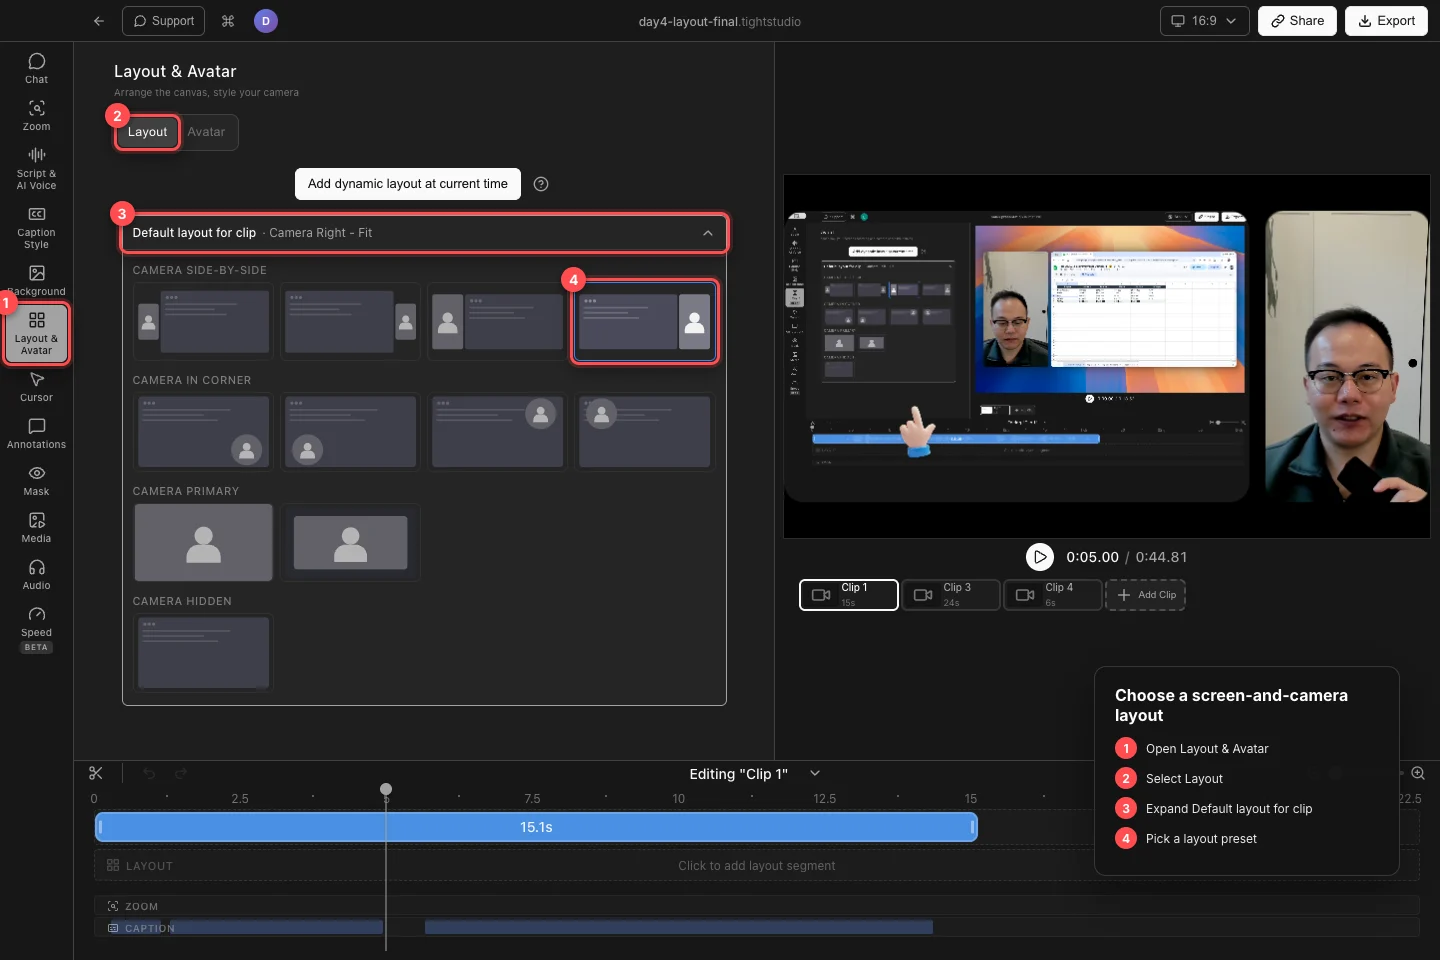
Open the default layout and choose a visual preset; the canvas updates as soon as a preset is selected. - Step 3
Choose how the screen and camera share the canvas
Use Camera Side-by-side for split-screen arrangements such as Camera Left, Camera Right, and their Fit variants. Fit keeps both panels at one reduced height; the non-Fit choices let the screen fill the canvas height.
Use Camera in Corner for picture-in-picture. The four Corner Overlay presets place the camera at the top-left, top-right, bottom-left, or bottom-right. On a vertical canvas, Camera Stacked places the camera above or below the screen with Fit or Cover behavior.
- Step 4
Feature one source
Under Camera Primary, choose Camera Only for an edge-to-edge camera, Camera Padded to keep the camera inside the background, or Camera Fit to preserve its native shape within the canvas. Vertical projects can also offer Camera 4:5 and Camera 1:1.
Under Camera Hidden, choose Screen Only to remove the camera from the composition while keeping the recorded screen. The camera recording remains in the project and can be restored by choosing another preset.
- Step 5
Fine-tune a corner camera
Selecting a Camera in Corner preset reveals camera controls below that row. Choose Round, Rounded Square, or Rounded Rectangle under Shape, then choose Small, Medium, or Large under Size.
For non-round shapes, use Roundness to refine the camera corners. The camera is repositioned to stay inside the selected corner as its shape or size changes.
- Step 6
Preview the layout across the clip
Play the clip and check that the camera does not cover important screen content or captions. Change the background and padding when a split, stacked, or padded layout needs more separation.
Layout defaults are stored per clip. Switch through the carousel and choose the appropriate default for each camera clip in a multi-clip project.
Troubleshooting
Why is Layout & Avatar missing?
The active clip has no camera recording. Select a clip that includes camera footage. Screen-only clips can still use canvas and background controls, but they do not show camera layout presets.
Why can’t I find Camera Stacked?
Camera Stacked is a vertical layout group. Change the canvas to 9:16 Vertical. On 16:9 Landscape, use Camera Side-by-side or Camera in Corner instead.
Why are some Camera Primary choices missing?
Tight Studio filters presets that do not fit the current aspect ratio, capture mode, or background. For example, Camera 4:5 and Camera 1:1 are vertical-only choices, and camera-only recordings show only compatible camera-primary layouts.
Why does the layout change only during part of the clip?
A dynamic Layout segment is overriding the default during that time range. Select the green segment on the Layout track to edit or delete it, or change Default layout for clip to control the areas outside dynamic segments.
Still stuck?
Send us a note with the project name and the step where you got blocked.