
Create automatic zooms
Turn recorded clicks and cursor motion into smooth zooms that guide the viewer.
Before you start
Automatic zooms use the pointer activity captured with a screen or window recording. Tight Studio generates them when a new recording opens in the editor and when you add a newly recorded clip; an imported video may not contain the input-event data needed to generate automatic zoom effects.
Select the clip you want to edit, then open Zoom. Zoom settings and the Zoom track apply only to that clip. Each automatic zoom is a separate time range that can follow one or more areas where the recorded pointer paused or clicked.
- Open settings
- Zoom in the left sidebar
- Automatic focus
- Auto Zoom Center on
- Remove all zoom effects
- Select all > Delete selected
Follow these steps
- Step 1
Review the automatic zooms
Open Zoom after recording. Existing Zooms lists each generated effect by its start and end time, and the Zoom track shows the same effects as gray blocks below the blue video track. Select a zoom block or its row to move the playhead to that effect and expand its controls.
Play through each effect in context. Auto Zoom Center follows the recorded pointer’s areas of interest during the selected range, so one automatic zoom can pan between several nearby focal points without separate manual centers.
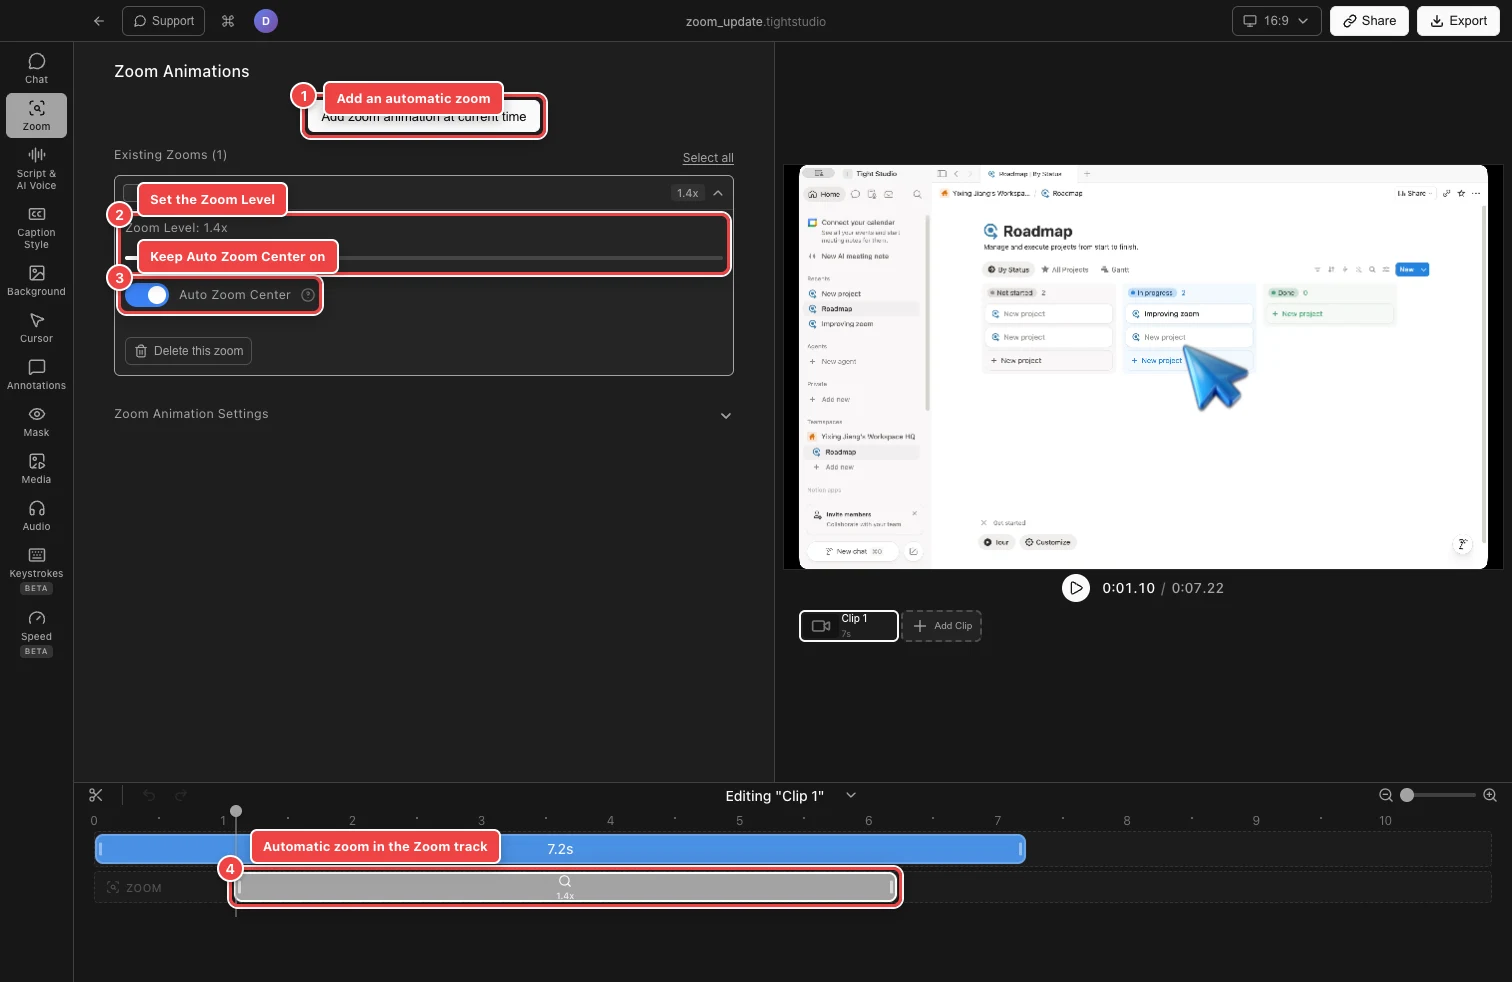
Expand an automatic zoom to set its strength and confirm that Auto Zoom Center is enabled. - Step 2
Add an automatic zoom where you need one
Move the playhead to an unzoomed moment, then select Add zoom animation at current time. You can also click an empty place in the Zoom track. Tight Studio adds a zoom in the available space, selects it, and seeks to its start.
A newly added zoom starts with Auto Zoom Center on. If another zoom occupies the requested time, Tight Studio adjusts the new range to fit a nearby gap when possible. It will not create overlapping zoom segments.
- Step 3
Set the zoom level
Expand the zoom row and drag Zoom Level from 1x to 5x. Lower values keep more surrounding context; higher values make the pointer’s target more prominent. Preview the start, any pointer-following motion, and the return to the full frame before choosing the final value.
Each existing zoom keeps its own value. When several effects should use the same strength, set one of them and select Apply zoom level to all other zoom segments.
- Step 4
Refine when the automatic zoom runs
Drag the body of a zoom block left or right to move the full effect. Drag either edge to change its start or end. Automatic pointer-following data is recalculated for the new range, so play the zoom again after changing its timing.
Zoom blocks cannot overlap and cannot be shorter than 0.1 seconds. Use the timeline’s See more detail control when an edge is difficult to position accurately.
- Step 5
Disable automatic zooms you do not want
To disable automatic zooms without removing their magnification, expand a zoom and turn Auto Zoom Center off. The effect becomes a manual zoom with a fixed center that you choose in the thumbnail.
To remove an effect completely, choose Delete this zoom. To remove every zoom from the selected clip, choose Select all, then Delete selected. Undo restores a deletion if you change your mind before continuing with a different edit.
Troubleshooting
Why were no automatic zooms created?
Automatic generation needs usable pointer activity from a Tight Studio screen or window recording. Camera-only clips and imported videos may not contain that data. Move the playhead to an empty part of the Zoom track and select Add zoom animation at current time to add one yourself.
Why does Add zoom animation say there is no space?
Zoom segments cannot overlap. Move the playhead to a gap between existing zooms, shorten a neighboring zoom, or delete an effect you no longer need before adding another.
Why does the automatic center follow the wrong area?
The center follows recorded pointer activity inside the zoom’s time range. Shorten or move the zoom so it contains only the intended interaction. For a fixed focal point, turn Auto Zoom Center off and choose a manual center.
Still stuck?
Send us a note with the project name and the step where you got blocked.