
Set the canvas aspect ratio and background
Choose a delivery shape and polish the recording with backgrounds, padding, roundness, and shadow.
Before you start
The canvas aspect ratio sets the shape of the finished project. Background settings control what appears around an inset screen or camera, and can be applied to the active clip or to every clip in a multi-clip project.
Choose the delivery shape before fine-tuning layouts and captions. The current aspect-ratio menu offers 16:9 Landscape and 9:16 Vertical; Auto can also appear when the source supports it. Square is not currently selectable from this menu.
- Horizontal
- 16:9 Landscape
- Vertical
- 9:16 Vertical
- Background sources
- Preset Image, Color, or My Brand
- Fine tuning
- Padding, Roundness, and Shadow Strength
Follow these steps
- Step 1
Choose the canvas aspect ratio
Open the aspect-ratio menu in the editor title bar. Choose 16:9 Landscape for a horizontal video or 9:16 Vertical for a portrait video.
The canvas updates immediately. Tight Studio also repositions camera and caption elements to keep them inside the new shape, but you should review their placement after switching orientation.
- Step 2
Open Background
Click Background in the left sidebar. Background Image opens with three source tabs: Preset Image, Color, and My Brand.
The preview stays visible while you work, so compare each choice against the screen recording, camera, and caption colors.
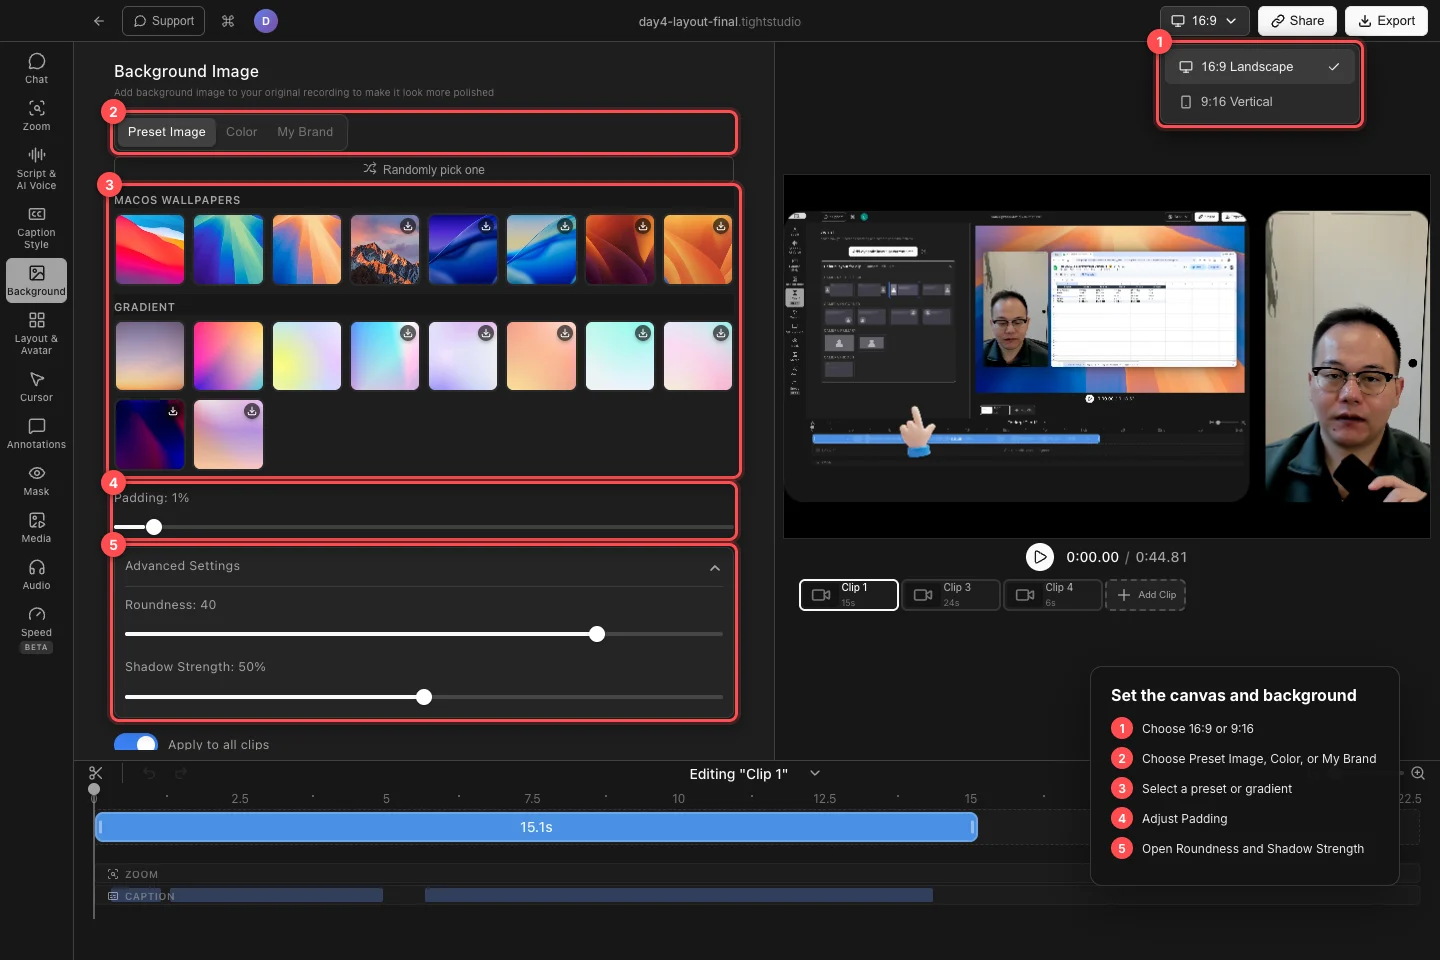
Choose the canvas shape, pick a background source, then refine the space, corners, and shadow around the recording. - Step 3
Choose a color, gradient, or image
Under Preset Image, choose from the available catalog sections, including macOS wallpapers and Gradient. A download badge means Tight Studio will fetch the full-resolution preset before applying it; Randomly pick one chooses a different available preset for you.
For a solid fill, open Color and choose Background Color. To use your own PNG, JPEG, or WebP image, open My Brand and click Select file or drag here. Click a selected image again when you want to remove that image background.
- Step 4
Set the space around the recording
Drag Padding to add or remove space between the recording and the canvas edge. At 0%, an edge-to-edge recording can cover the background completely; increasing Padding reveals more of it.
Check small text and browser chrome in the preview after adding padding, because the recording becomes smaller as the surrounding space grows.
- Step 5
Adjust roundness and shadow
Expand Advanced Settings. Use Roundness to change the recording’s corner radius and Shadow Strength to control how strongly it separates from the background.
These controls are disabled when no background is active. Select a color or image first, then make the finishing adjustments.
- Step 6
Apply the look to the right clips
In a multi-clip project, leave Apply to all clips on to copy background, padding, and roundness changes to every clip. Turn it off when the active clip should have its own background treatment.
Switch through the clip carousel and review each canvas. Some full-canvas layouts intentionally hide the background, even when a background is selected.
Troubleshooting
Why can’t I see the background?
Increase Padding above 0% or choose a layout that leaves space around the recording. Camera Only and other edge-to-edge layouts can intentionally cover the background.
Why did only one clip change?
Apply to all clips was turned off when the setting changed. Select the clip with the desired look, turn Apply to all clips on, and make the selection or adjustment again.
Why don’t I see Square (1:1)?
Square is not currently offered in the editor’s aspect-ratio menu. The available delivery shapes are 16:9 Landscape and 9:16 Vertical, with Auto shown only for compatible projects.
Why will a preset image not apply?
Some catalog images must be downloaded first. Check the internet connection, click the preset again, and wait for its download indicator to finish. Color and already-downloaded backgrounds remain available without that fetch.
Still stuck?
Send us a note with the project name and the step where you got blocked.