
Record a connected iPhone or iPad
Connect a trusted iOS device over USB and capture it directly into a Tight Studio project.
Before you start
Use a USB cable that supports data, not a charge-only cable. Connect the iPhone or iPad directly to the Mac, unlock it, and keep it awake while Tight Studio looks for it.
The first time you connect the device, tap Trust on the iPhone or iPad and enter its passcode. Tight Studio cannot list an untrusted or locked device.
For iPhone recording or iPad recording, choose Device capture and complete USB trust before starting.
- Capture source
- A connected iPhone or iPad
- Connection
- USB with the device unlocked and trusted
- Optional audio
- Device audio and a Mac microphone can be recorded separately
Follow these steps
- Step 1
Connect, unlock, and trust the device
Plug the iPhone or iPad into the Mac over USB. Unlock the device, tap Trust if prompted, and enter the device passcode.
Leave the device connected and awake. If macOS or the device asks whether to allow the accessory, approve the connection before opening the recorder.
- Step 2
Choose Device in the recorder
From Home, click Start recording. Under Capture Area, click Device.
The screen and camera choices are replaced by a Device selector. Tight Studio polls for connected iOS devices; while it scans, the selector can show “Looking for devices...”.
- Step 3
Select the iPhone or iPad
Open the selector below Device and choose the connected iPhone or iPad. Start Recording becomes available only after a device is selected.
Device mode records the connected device itself. It does not add the Mac camera overlay, so the Camera row is hidden in this mode.
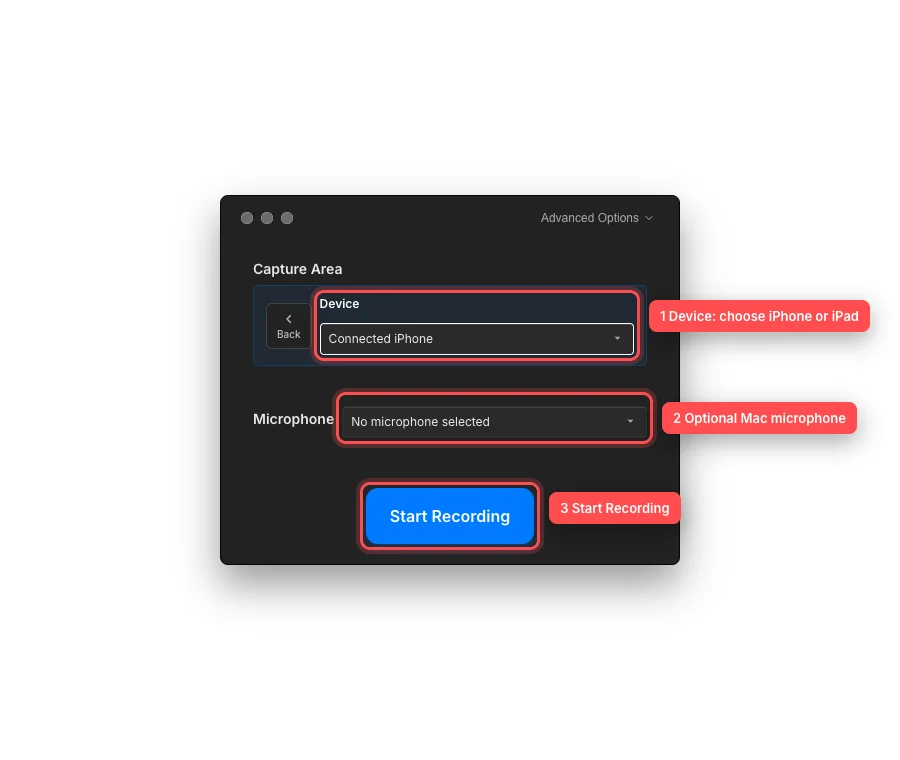
Select the connected device, optionally choose a microphone, then start the recording. - Step 4
Choose audio and start recording
To narrate the demonstration, choose a Mac input under Microphone. Select No microphone selected when you do not want narration.
To capture sound playing on the iPhone or iPad, open Advanced Options and turn on Record system audio. You can enable both device audio and a Mac microphone; Tight Studio keeps them as separate audio sources for editing.
Click Start Recording. Use the connected device normally while Tight Studio captures its screen, then use the recording controls to finish the take.
- Step 5
Edit and export the device recording
When recording stops, the new Device clip opens in the editor. Tight Studio automatically places it in the device frame and rounds the screen corners; the frame is part of the final export.
You can trim the clip, add zooms, and use other editor tools normally. Zooms move and scale the device content with the frame, so preview the full movement before exporting.
Troubleshooting
Why does Tight Studio say “No devices found”?
Unlock the iPhone or iPad, reconnect it with a data-capable USB cable, and tap Trust if prompted. Try another USB port or cable, then click Back and choose Device again so Tight Studio rescans.
Why is Start Recording disabled?
Device mode requires a selected iPhone or iPad. Open the Device selector and choose its name. If the selector returns to No device selected, check the cable and keep the device unlocked.
Why can’t I hear sound from the iPhone or iPad?
Open Advanced Options before recording and turn on Record system audio. The Microphone selector controls narration from the Mac; it does not enable sound playing on the connected device.
Why was my narration not recorded?
Choose a Mac input under Microphone and allow microphone access when macOS asks. Speak and check the input level before starting. If No microphone selected is shown, Tight Studio records without Mac-microphone narration.
Still stuck?
Send us a note with the project name and the step where you got blocked.