
Remove or replace the camera background
Keep, remove, or replace a camera background with a built-in or custom image.
Before you start
Camera background controls require a clip with camera footage. Open Layout & Avatar, select Avatar, and choose a layout that displays the camera so you can judge the result on the canvas.
Background removal works best with even lighting and clear separation between you and the room behind you.
Choose No background for a transparent background, or use Upload background to add your own virtual scene.
- Panel
- Layout & Avatar → Avatar
- Options
- Original, No background, built-in backgrounds, or Upload
- Best input
- Even light and a contrasting background
Follow these steps
- Step 1
Open the Avatar controls
Select the camera clip, open Layout & Avatar, and choose Avatar. The Camera Background gallery appears above the camera adjustments.
Original is selected when Tight Studio should keep the room exactly as it was recorded.
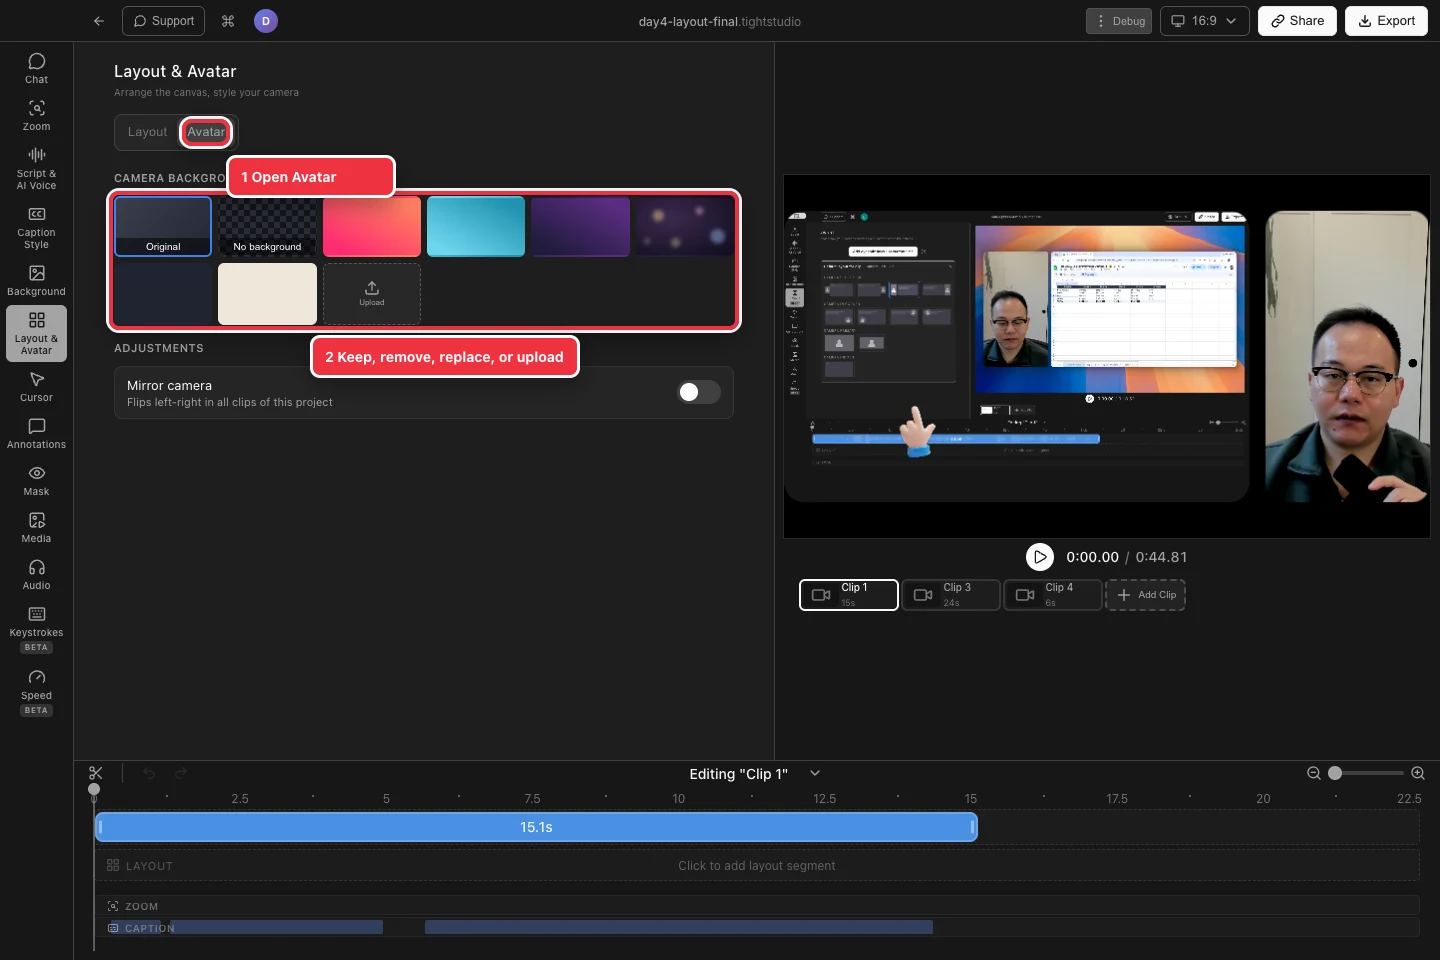
Use Camera Background to keep, remove, replace, or upload a backdrop. - Step 2
Make the camera background transparent
Choose No background to enable camera background removal and keep only the person. The canvas background or screen remains visible behind the camera cutout.
Preview movement around hair, glasses, and hands before exporting; these edges reveal poor lighting most clearly.
- Step 3
Choose a virtual background
Select any built-in tile to place that virtual background behind the camera subject. Tight Studio continues separating the subject, then composites the selected image into the camera frame.
Try a simple background with enough contrast from clothing and skin tones for a cleaner result.
- Step 4
Upload your own background
Choose Upload and select an image from your Mac. Use a high-resolution image with a similar shape to the camera layout to reduce unwanted cropping.
The uploaded image becomes another camera-background choice for the project. Review it in every layout that uses the camera.
- Step 5
Restore the recorded room
Choose Original at any time to turn the effect off and show the recorded camera background again. This does not delete the camera or the previously selected virtual background.
Play the clip once more to confirm the subject remains sharp and the camera position still works with the chosen layout.
Troubleshooting
Why is No background missing?
Select a clip that contains camera footage and open Layout & Avatar → Avatar. Camera-only and screen-with-camera recordings support the control; screen-only clips do not.
Why do the cutout edges flicker?
Use brighter, more even lighting and increase contrast between the subject and the room. Fast motion, hair, and similarly colored backgrounds are the most difficult edges.
Why is my uploaded image cropped?
The virtual background fills the active camera shape. Use an image with a compatible aspect ratio or choose a different camera shape/layout.
Still stuck?
Send us a note with the project name and the step where you got blocked.