
Rename, reorder, duplicate, hide, and delete clips
Keep a multi-clip project organized and choose which clips play and export.
Before you start
A multi-clip project shows its clips in the horizontal carousel directly below the video preview. Selecting a card switches the preview, settings panel, and timeline to that clip; the card order is also the playback and export order.
Clip actions change only the current project. Duplicate creates an independent copy, Hide keeps a clip in the project but omits it from playback and export, and Delete moves it to Trash after confirmation.
- Open clip menu
- Three-dot button or right-click a clip card
- Change order
- Drag a clip card horizontally
- Recover deletion
- Home > Trash for up to 7 days
Follow these steps
- Step 1
Select a clip and open its menu
Click a card in the clip carousel to select it. The selected card receives an outline, and the timeline heading changes to Editing followed by the clip name.
Click the card’s three-dot button or right-click the card to open the same menu. The available actions are Rename, Duplicate, Hide or Unhide, and Delete.
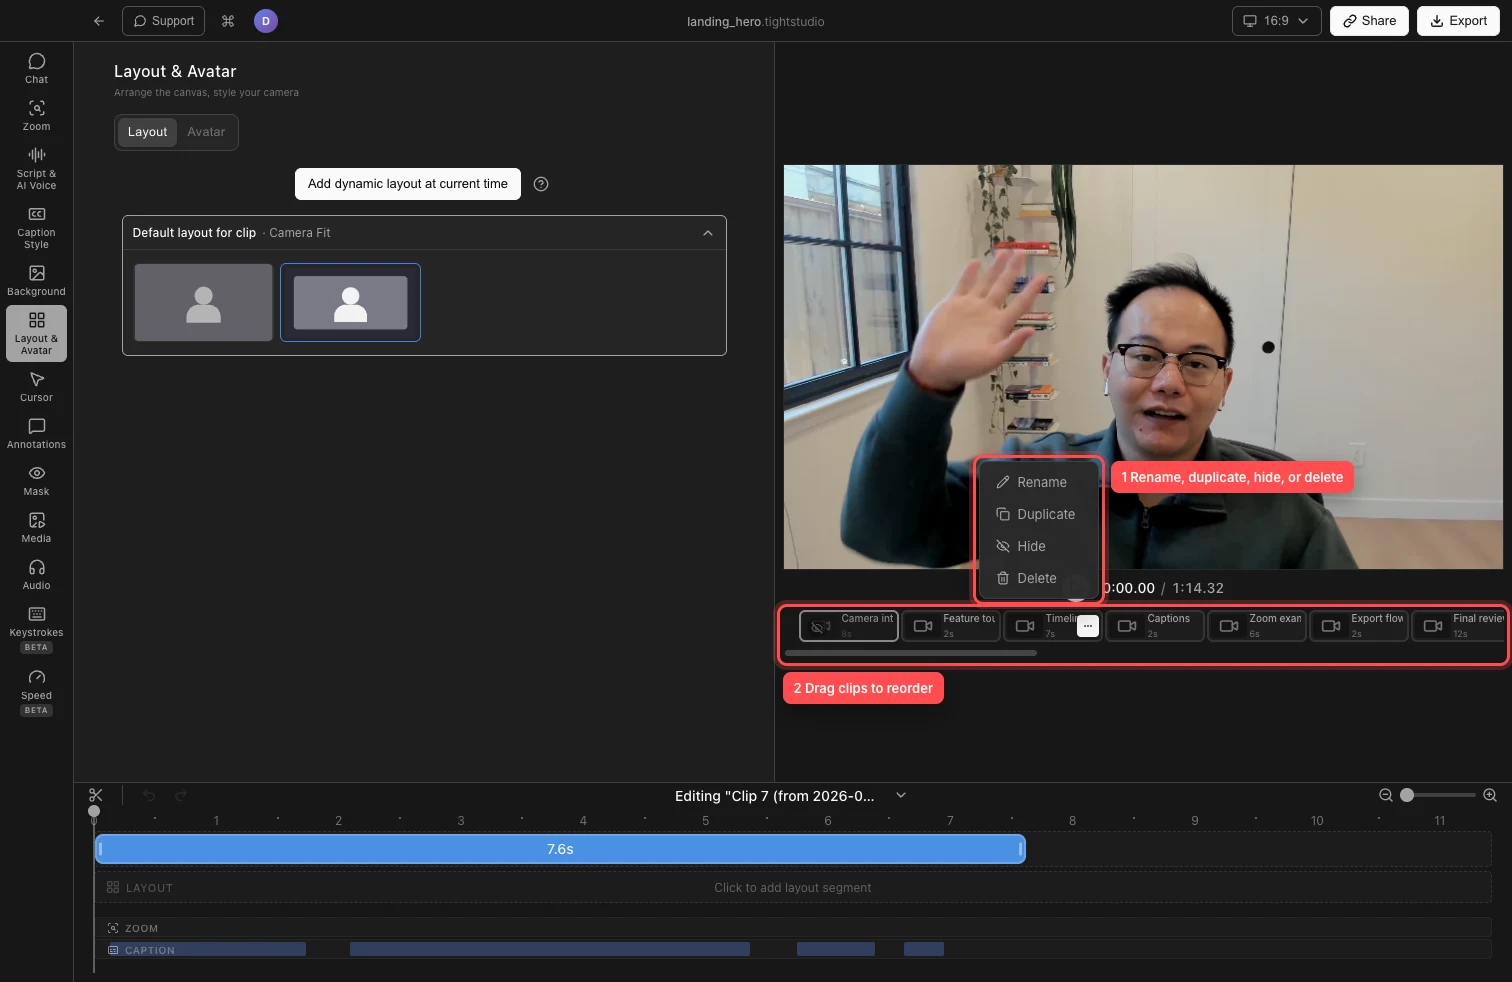
Use the clip menu for one clip, or drag cards along the carousel to change their order. - Step 2
Rename a clip
Open the clip menu and choose Rename. Enter a short descriptive title in the card, then press Enter or click elsewhere to save it. Press Escape to cancel instead.
The rename clip action changes the label in the carousel and the Editing heading. It does not rename the entire project shown in the title bar.
- Step 3
Drag to reorder clips
Press and hold on the body of a clip card, drag it left or right, and release it at the intended position. Nearby cards shift to show where the clip will land.
The new order controls how visible clips play and export. With many clips, use the horizontal scrollbar below the cards to reach a destination farther along the carousel.
- Step 4
Duplicate a clip
Open the source clip’s menu and choose Duplicate. Tight Studio creates the duplicate clip immediately after the source and selects the new card.
The copy keeps the source clip’s media and hand-tuned edits, including its captions and zooms, but receives its own recording resources. Later changes or deletion of one copy do not alter the other.
- Step 5
Hide or unhide a clip
Choose Hide when a clip should remain available for later but should not play or appear in the export. A hidden card becomes dim and displays an eye-off badge.
Open that card’s menu and choose Unhide to return it to playback and export. Tight Studio prevents the hide clip action when it would leave the video with no visible clips; unhide clip is always available for an already-hidden card.
- Step 6
Delete or restore a clip
Open the clip menu, choose Delete, and confirm the Delete clip? dialog. The clip is removed from the carousel and placed in Trash. Tight Studio disables delete clip when it is the only clip in the project.
To recover it, return to Home, select Trash, open the deleted clip’s menu, and choose Restore. Deleted clips are labeled with their project name and are automatically removed from Trash after 7 days.
Troubleshooting
Why can’t I drag a clip to a new position?
Start on a non-interactive part of the card rather than the three-dot button, then move at least a few pixels before releasing. If the destination is offscreen, use the horizontal scrollbar first and try the drag again.
Why is Hide disabled?
At least one visible clip must remain in the video. Unhide another clip or add a new clip, then open the menu again and choose Hide.
Why is Delete disabled?
A project must keep at least one clip. Add or duplicate a clip before deleting the current one. If it is a Team Workspace project, the action can also be unavailable while you have read-only access to a clip being edited by someone else.
Why does a hidden clip still appear in the carousel?
Hide is nondestructive: the dim card stays in the editor so you can select and unhide it later. It is skipped only in continuous playback and export.
Still stuck?
Send us a note with the project name and the step where you got blocked.