
Send diagnostics and contact support
Open Support, include the right context, and send diagnostic information that helps resolve an issue.
Before you start
Use Support for a product question, bug report, or feedback. A clear description of what happened, where it happened, and how to reproduce it is more useful than a one-line error message.
When you send the form, Tight Studio automatically includes diagnostic system information such as the app version and macOS version. It does not attach the project bundle, source recordings, or screenshots.
- Open from
- Support in the editor title bar
- Message limit
- 1,000 characters
- Automatic context
- App and macOS version information
- Urgent support
- Use the phone contact shown in Support
Follow these steps
- Step 1
Open Support from the affected project
Open the project where the problem occurs and click Support in the upper-left title bar. Opening it from the affected project lets you keep the relevant screen and timeline state visible while writing.
The Support panel separates the urgent contact from the standard message form. Use the urgent route only when immediate help is genuinely needed.
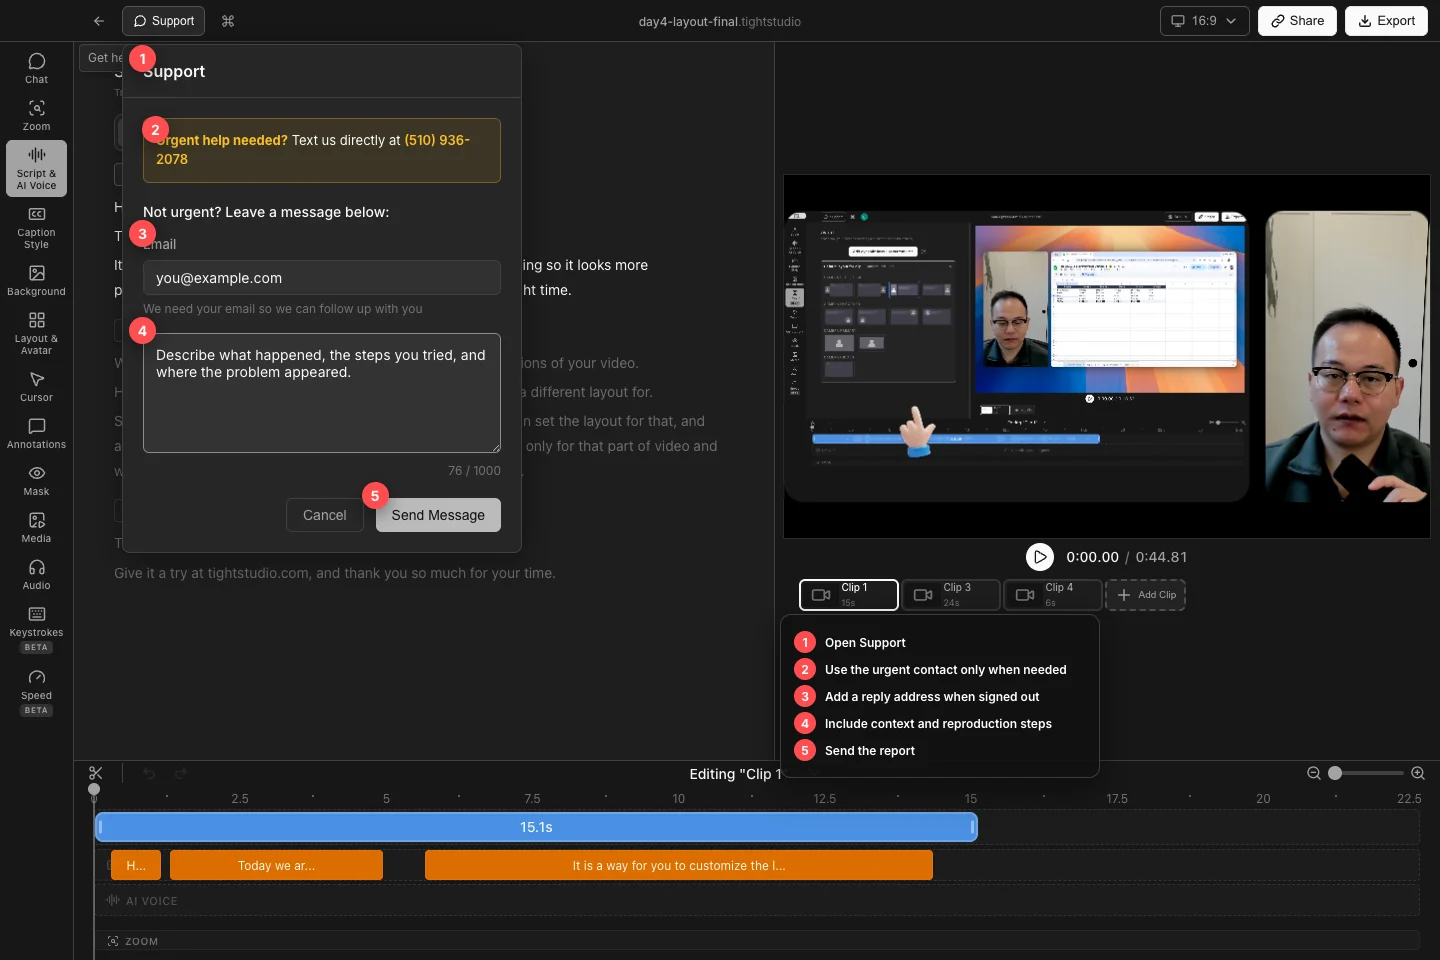
Open Support, choose the appropriate contact route, and include enough context for the issue to be reproduced. - Step 2
Choose urgent help or a standard message
For urgent help, use the phone number shown beside Urgent help needed?. Clicking the number opens the Mac’s configured messaging handler.
For normal questions and feedback, use the section labeled Not urgent? Leave a message below:. The form says the team will get back to you within 24 hours.
- Step 3
Confirm the reply email
When signed in, Support shows the account under From:. When signed out, enter a valid address under Email; the hint says, “We need your email so we can follow up with you.”
Check the address carefully before sending. The Send Message button remains disabled when a signed-out report has no valid email.
- Step 4
Include useful reproduction details
Within the 1,000-character limit, state what you expected, what happened instead, the project area or exact button involved, and the shortest sequence that reproduces the issue. Include the exact error text and whether retrying or reopening changed it.
The submitted diagnostic record already includes platform details, the Tight Studio app version, and macOS version information. If support needs a screenshot, recording, or project file, attach it when replying to their follow-up email rather than assuming the form uploaded it.
- Step 5
Send the message and keep the project available
Click Send Message. While the report is submitting, the button changes to Sending…. A successful report shows “✓ Thank you for your message! We'll get back to you soon.” and then closes.
Keep the affected project and source media until the issue is resolved. If the problem blocks work, avoid destructive changes and note any temporary workaround in the follow-up.
Troubleshooting
Why is Send Message disabled?
Enter a non-empty message. If you are signed out, also enter a valid Email address; the signed-in account email is used automatically when you are authenticated.
Why did the report fail to send?
Check the internet connection and try again. Preserve the message text before closing the panel; if the problem is urgent, use the direct phone contact shown in Support.
Where do I find the app and macOS versions?
Support includes those diagnostics automatically. To view the app version yourself, choose Tight Studio → About Tight Studio from the macOS menu; macOS also shows its version under Apple menu → About This Mac.
Still stuck?
Send us a note with the project name and the step where you got blocked.