
Start a recording and choose what to capture
Record a full display, one window, or a custom area and switch sources before you begin.
Before you start
Start a new recording from Home. Tight Studio then opens a separate recording-controls window where you choose the screen source, camera, and microphone before anything is captured.
If you use more than one display, place the recording-controls window on the display you want to capture. Tight Studio uses that window as the display picker for Full Display and as the initial display for a new Crop selection.
- Full Display
- Captures the complete display that holds the recording controls
- Window
- Captures one open window chosen from Select Window
- Crop area
- Captures a resizable part of a display
Follow these steps
- Step 1
Open the recording controls
On Home, click Start recording. Tight Studio hides Home and opens the recording-controls window over your desktop.
You can move this window before recording. On a multi-display setup, drag it onto the display you intend to record before choosing Full Display.
- Step 2
Choose what to capture
In Capture Area, choose Crop, Window, or Full Display. Full Display is selected by default and records the complete display that contains the recording-controls window.
Crop creates an adjustable selection on a display. Window opens the Select Window picker so you can choose one open application window from its thumbnail. The Crop button uses the tooltip Crop area.
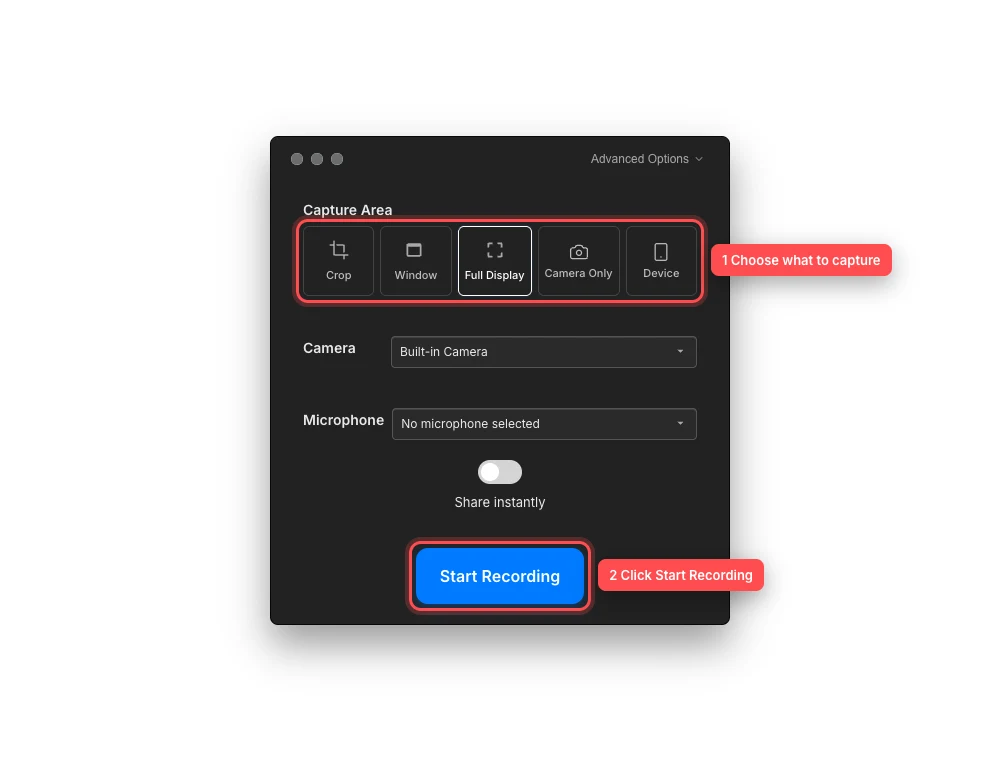
First choose the capture source, then start the recording when the inputs are ready. - Step 3
Confirm the display, window, or crop area
For Full Display, confirm the recording-controls window is on the correct display. Moving the controls to another display switches the Full Display target.
For Window, click Window and choose the intended thumbnail in Select Window. Tight Studio remembers that exact window, not every window owned by the application.
For Crop, move and resize the selection handles around the content you want. Choosing a crop on another display makes that display the active capture target.
- Step 4
Check the camera and microphone
Use the Camera menu to add a camera overlay or choose No camera selected. Use the Microphone menu to select narration audio or No microphone selected.
Camera Only and Device are separate capture modes shown in the same row. Use the dedicated camera and iPhone or iPad guides for their device-selection steps.
- Step 5
Click Start Recording
When the source is selected, click Start Recording. The button changes to Starting… while Tight Studio validates the target and prepares the recording stream.
The current recording flow does not show a separate 3–2–1 countdown. Treat the Starting… state as preparation time and be ready before you click; recording begins as soon as the source is active.
Troubleshooting
Why is Start Recording unavailable?
Select Crop, Window, or Full Display first. A screen recording is ready as soon as it has a capture mode; Camera Only and Device also require a camera or iPhone/iPad selection before the button becomes available.
Why is the window I want missing from Select Window?
Make sure the window is open, then close and reopen the Window picker so Tight Studio rescans. If a previously selected window closed, use Pick another window in the error message and select its current thumbnail.
Why did Full Display capture the wrong monitor?
Before clicking Start Recording, drag the recording-controls window onto the intended display and choose Full Display again. The display containing that window is the Full Display target.
Where is the recording countdown?
There is no separate visible countdown in the current version. After you click Start Recording, wait while the button says Starting…; recording begins when the source is ready.
Still stuck?
Send us a note with the project name and the step where you got blocked.