
Record with a camera and microphone or camera only
Choose camera and microphone devices, check input, and record with or without the screen.
Before you start
Connect the camera and microphone you want to use before opening the recording controls. On first use, macOS may ask for Camera permission or Microphone permission; allow access, then return to Tight Studio.
A camera and a microphone are both optional for an ordinary screen recording. Camera Only requires a camera, while narration is always optional.
- Screen recording
- Capture the screen with a camera, without a camera, or without a microphone
- Camera-only recording
- Captures the selected camera instead of the screen
- Input check
- The audio level appears below a selected microphone
Follow these steps
- Step 1
Choose a screen capture mode or Camera Only
Open the recording controls. For a screen with camera, select Crop, Window, or Full Display under Capture Area, then keep a camera selected in the Camera row.
To record your camera without the screen, select Camera Only. The Capture Area row changes to Recording Mode and places the camera picker inside it.
- Step 2
Choose the camera and microphone
Open the camera picker and select the camera you want. In a screen recording, select No camera selected when you do not want a camera overlay.
Open the microphone picker and select an input for narration. Select No microphone selected when the recording should not include your microphone.
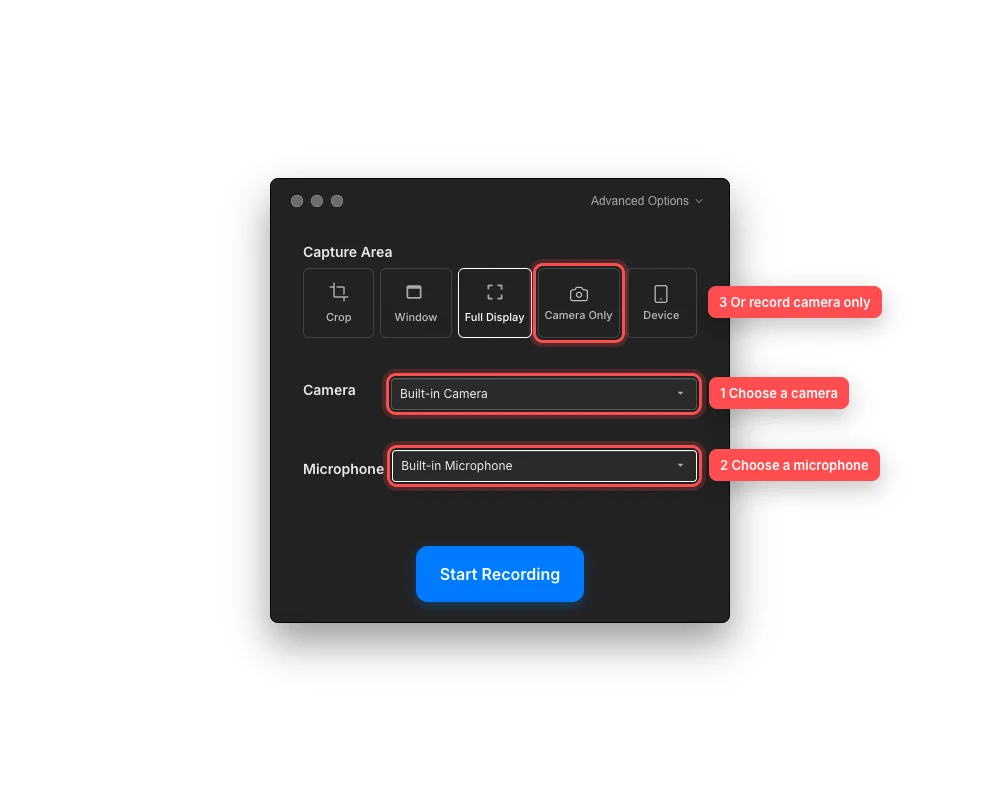
Choose devices for a screen recording, or switch to Camera Only when the camera should be the entire recording. - Step 3
Check the microphone audio level
After choosing a microphone, speak at your normal recording volume. The audio level meter below the microphone picker should move as Tight Studio receives sound.
If the meter stays empty, reselect the intended microphone before recording. This avoids finishing a take with the wrong input or no narration.
- Step 4
Set up a camera-only recording
Select Camera Only, then choose a device in the inline camera picker. Tight Studio does not capture the display in this mode.
Choose a microphone for narration, or leave No microphone selected for a silent camera-only video. Select Back to return to the screen capture modes.
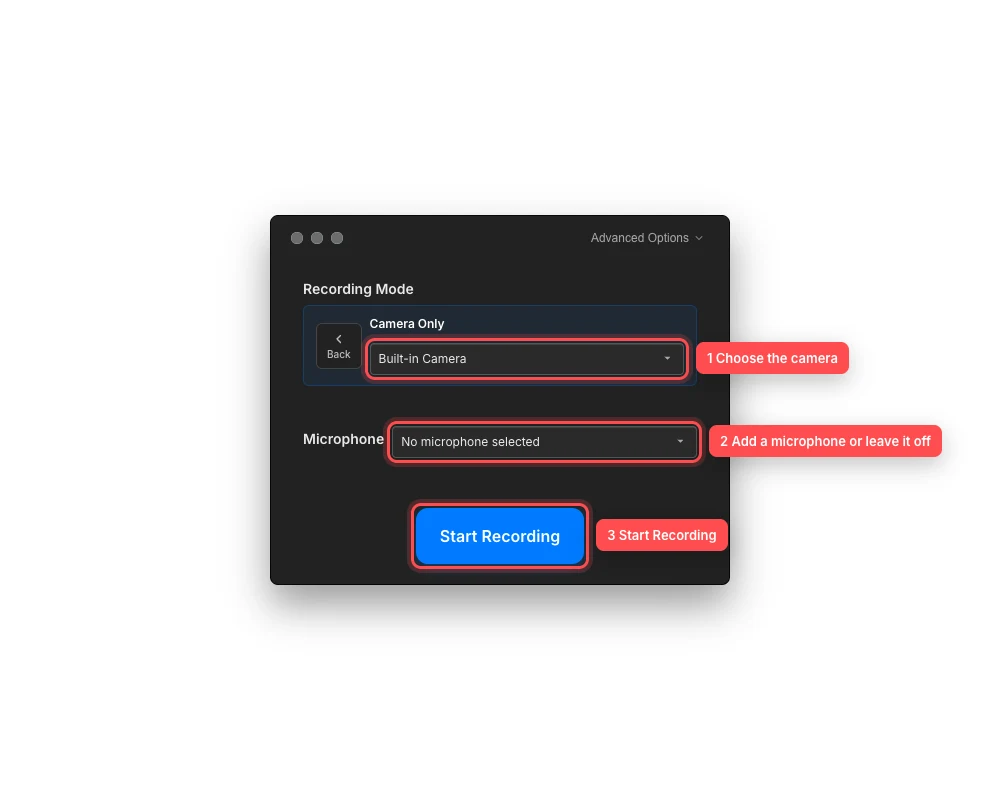
Camera Only needs a camera selection; adding a microphone remains optional. - Step 5
Record without a microphone when needed
To record without microphone audio, choose No microphone selected and select Start Recording.
When a camera is enabled, Tight Studio shows Record without microphone? before it begins. Select Record Without Audio to continue, or Cancel to return and choose a microphone.
- Step 6
Start the take
Confirm the capture mode, camera, and microphone one last time, then select Start Recording.
During the take, use the recording control panel to pause, resume, restart, or finish. Tight Studio opens the finished recording as a new project or clip.
Troubleshooting
Why is my camera or microphone missing from its picker?
Reconnect the device, close any app that has exclusive control of it, and open the picker again. If the row asks for access, enable Tight Studio in System Settings > Privacy & Security > Camera or Microphone, then restart the app.
Why does the audio level meter not move?
Make sure the correct microphone is selected and is not muted by a hardware switch or audio interface. Speak close to the microphone, then reselect it. If it remains silent, verify Microphone access in macOS and test another input.
Why is Start Recording unavailable in Camera Only?
Camera Only cannot start until a working camera is selected in its inline camera picker. Choose a camera, or select Back and use Crop, Window, or Full Display instead.
Why did Tight Studio ask me to confirm a silent recording?
A camera is enabled while No microphone selected is active. Choose Record Without Audio if that is intentional, or Cancel and select a microphone before starting again.
Still stuck?
Send us a note with the project name and the step where you got blocked.