
Create and position manual zooms
Add a zoom where you need it, choose the focus point, and tune its animation style and duration.
Before you start
A manual zoom keeps one fixed focal point for its full time range. Open a project, select the clip you want to edit, and choose Zoom in the left sidebar. Position the playhead on a frame where the target is easy to identify before adding the effect.
The current editor animates zooms in and out. It does not expose a separate instant-zoom control; Punchy with a 0.5s Animation Duration is the fastest available transition.
- Add zoom
- Add zoom animation at current time
- Manual focus
- Auto Zoom Center off
- Fastest transition
- Punchy, 0.5s
Follow these steps
- Step 1
Add a zoom at the playhead
Scrub to the moment where the manual zoom should begin, then select Add zoom animation at current time. You can also click an empty point in the Zoom track. Tight Studio creates the effect in the available gap and expands its settings.
The new effect begins as an automatic zoom. The next steps convert it to a manual zoom and set the fixed focal point.
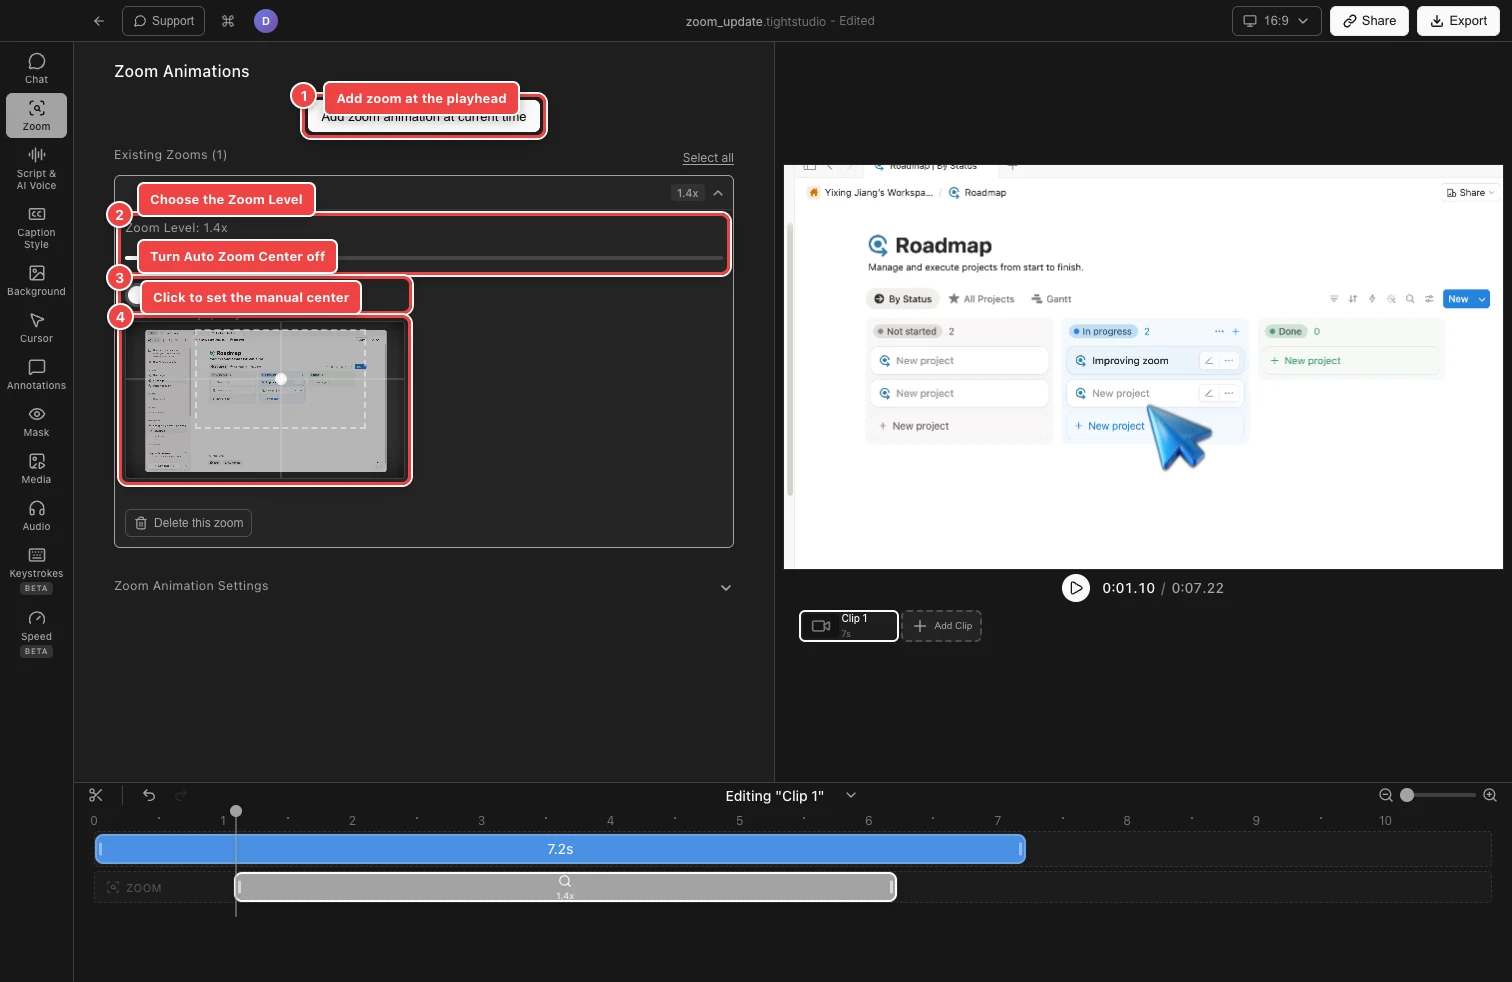
Turn off Auto Zoom Center, then click the frame thumbnail to place a fixed manual center. - Step 2
Switch to a manual zoom
Expand the zoom under Existing Zooms and turn Auto Zoom Center off. The frame thumbnail appears below the toggle with a dashed zoom-area box and a center marker.
Turning the toggle off changes only the selected effect. Other automatic zooms in the clip continue to follow their recorded pointer activity.
- Step 3
Choose the manual center
Click the subject inside the frame thumbnail. The center marker moves to that point, and the dashed box shows the approximate area that will remain visible at the current Zoom Level.
Place the marker on the control, text, or visual detail the viewer should notice. Preview the zoom in the main canvas and reposition the manual center if important content is clipped.
- Step 4
Set the zoom level and timing
Drag Zoom Level between 1x and 5x. A stronger level produces a tighter dashed area around the manual center. This changes the selected effect; use Apply zoom level to all other zoom segments when the clip’s other zooms should match it.
In the Zoom track, drag the effect to move it or drag an edge to resize it. Zooms cannot overlap and must remain at least 0.1 seconds long. Use See more detail on the timeline before making a precise timing adjustment.
- Step 5
Use the fastest available transition
Expand Zoom Animation Settings. Under Animation Style, choose Punchy, then set Animation Duration to 0.5s. This is the quickest current treatment and gives a snappier result than Smooth or the longer 0.75s and 1s durations.
There is no separate Instant option in the current Zoom Animations panel, so a true animation-free instant cut is not available from this workflow. Preview Punchy at 0.5s to confirm that its brief movement suits the edit.
Troubleshooting
Why can’t I see the manual-center thumbnail?
Select and expand one zoom, then turn Auto Zoom Center off. The thumbnail is hidden while automatic centering is enabled and while no single zoom is expanded.
Why was the new zoom added at a different time?
Tight Studio prevents overlapping zooms and may adjust the new segment to fit the nearest available gap. Move the playhead to a clear gap or shorten the neighboring effect first.
Why don’t I see an Instant option?
The current editor offers Punchy or Smooth animation with 0.5s, 0.75s, and 1s durations. Choose Punchy and 0.5s for the fastest available zoom transition.
Still stuck?
Send us a note with the project name and the step where you got blocked.