
How to add a recording clip to an existing video
Build one video from multiple recorded takes and understand clip limits on the Free plan.
Before you start
A multi-clip video keeps several recorded takes inside one Tight Studio project. Each take has its own card in the clip carousel, so you can switch between clips while editing and play them as one sequence.
You must be signed in to add a clip to an existing project. On the Free plan, five successful Add Clip additions are included across all of your projects. Starting a separate new recording remains free and does not use this allowance.
Use multiple takes when one project needs several sections; the Free clip limit applies to successful additions, while paid plans allow unlimited clips.
- Start here
- Open an existing project in the editor
- Recording command
- Add Clip → Add recording clip
- Free allowance
- 5 saved Add Clip additions across all projects
- Paid plans
- Unlimited multi-clip recording on Plus and Pro
Follow these steps
- Step 1
Open the project you want to extend
Open a project from Home. Below the video preview, the clip carousel shows the project’s current takes. The selected card has a bright outline, and the timeline below it belongs to that clip.
Move the playhead to review the current take before recording the next one. Adding a recording clip keeps the existing take and appends the new take to the same project.
- Step 2
Choose Add recording clip
Click Add Clip beside the clip cards, then choose Add recording clip. Tight Studio opens the recorder for a new take while keeping this project as the destination.
The same menu can also import media or a clip from another video. For a new screen or camera take, use Add recording clip.
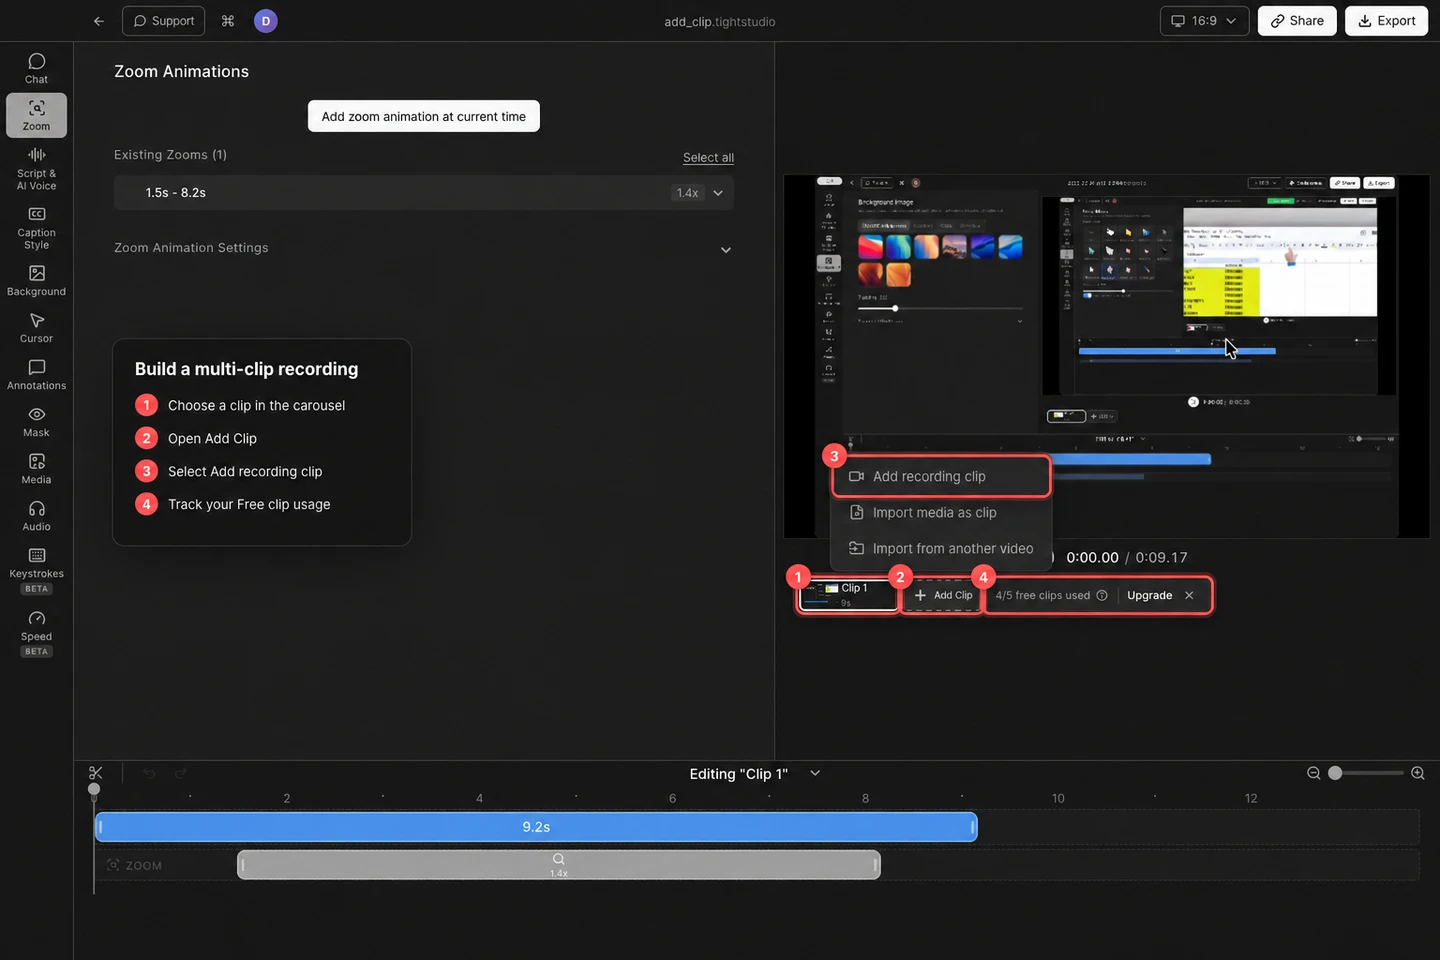
Choose Add Clip → Add recording clip. Free accounts see their saved Add Clip usage beside the carousel after the fourth addition. - Step 3
Set up and record the next take
In the recorder, choose the capture area, camera, microphone, and any Advanced Options you need. These settings can be chosen for the new take without removing the clips already in the project.
Click Start Recording, complete the take, then stop the recording from the recording controls. Tight Studio saves the recording into the existing project and returns focus to its editor.
- Step 4
Switch between the recorded takes
The saved take is appended to the carousel with the next automatic name, such as Clip 2, and becomes the selected clip. Click any clip card to switch the preview and timeline to that take.
Edit each take as needed. The carousel is also where you can see the order of clips in the project; use the separate clip-management controls when you need to rename, reorder, duplicate, hide, or delete a clip.
- Step 5
Track the Free clip allowance
After the fourth saved addition, Free accounts see “4/5 free clips used” beside Add Clip. The allowance counts successful Add Clip additions across all projects, not five additions per project.
After all five additions are used, choosing an Add Clip option opens “Upgrade for unlimited clips.” Plus and Pro include unlimited multi-clip recording. If you do not upgrade, you can still return Home and create a separate new recording for free.
Troubleshooting
Why does Add Clip ask me to sign in?
Adding clips to an existing project requires an account. Complete the “Sign in to add clips” prompt, return to the project, and choose Add Clip → Add recording clip again.
Why do I see “Upgrade for unlimited clips”?
The Free account has already saved five Add Clip additions across its projects. Plus and Pro remove this limit. You can also return Home and create a separate new recording without using Add Clip.
Why did the new clip not appear in the carousel?
A clip is added only after the recording is stopped and saved successfully. If you canceled the recorder, nothing is added and no Free use is consumed. Record again, stop the take, and wait for the existing project to regain focus.
How do I edit a different take?
Click its card in the clip carousel. The selected outline, video preview, and timeline move to that clip. For renaming, reordering, hiding, duplicating, or deleting takes, see the clip-management guide.
Still stuck?
Send us a note with the project name and the step where you got blocked.